84 CR500 Rebuild

Recount your rebuilds here!
BrianPaul69
Posts: 110
Joined: September 11th, 2010, 3:01 pm
Location: Carney's Point, NJ

84 CR500 Rebuild

Post by BrianPaul69 »

Well things have been nothing less than chaotic this past few months but even through the hectic schedule I managed to get a little work done on my 84 CR500. I bought is off Craigs last year and I was under the impression it was just a cosmetic mess. The guy actually brought it down from Maryland on his way to Myrtle Beach and dropped it off. It was about 11PM when he got here and there was no way I was going to fire it up that late. Honestly I don't ever fire a new bike without going through some preliminary checks first like being sure it has an air filter, actually has oil in the premix, trans oil is in there etc...

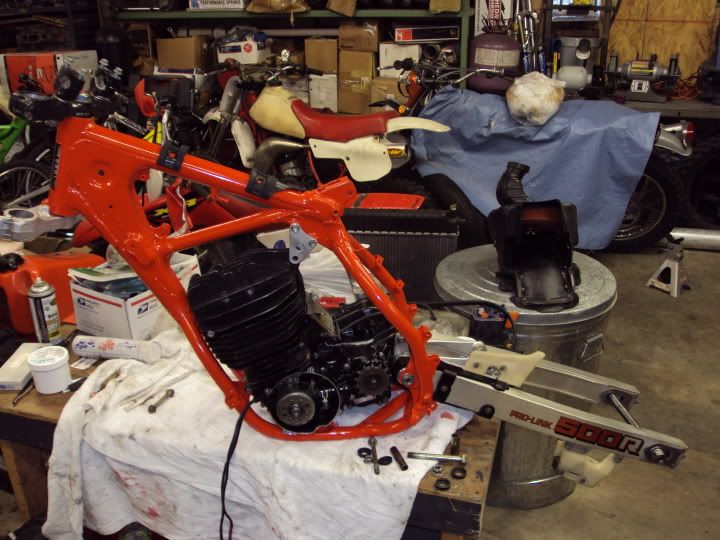
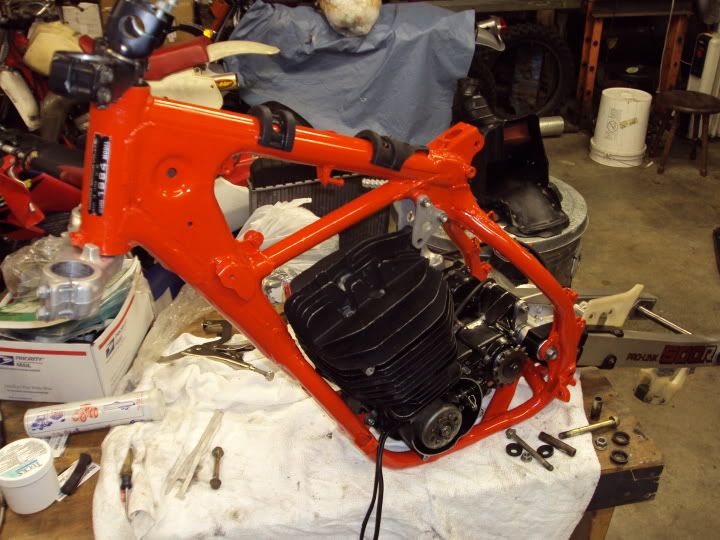
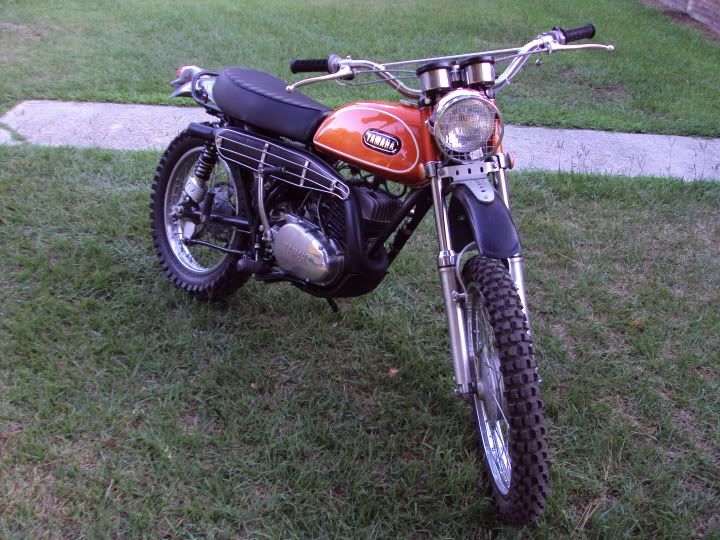
The next day when it I could see I started to look it over really close and after paying $800.00 I realized it was about a $400.00 bike if that. I was so pissed I didn't even take many pictures of the stuff that was wrong.

Here is a small list :

1. Clutch cover had a big hole in it (half ass fixed with JB) due to the primary crank gear bolt coming out.

2. Trans was empty due to a blown out clutch cover gasket

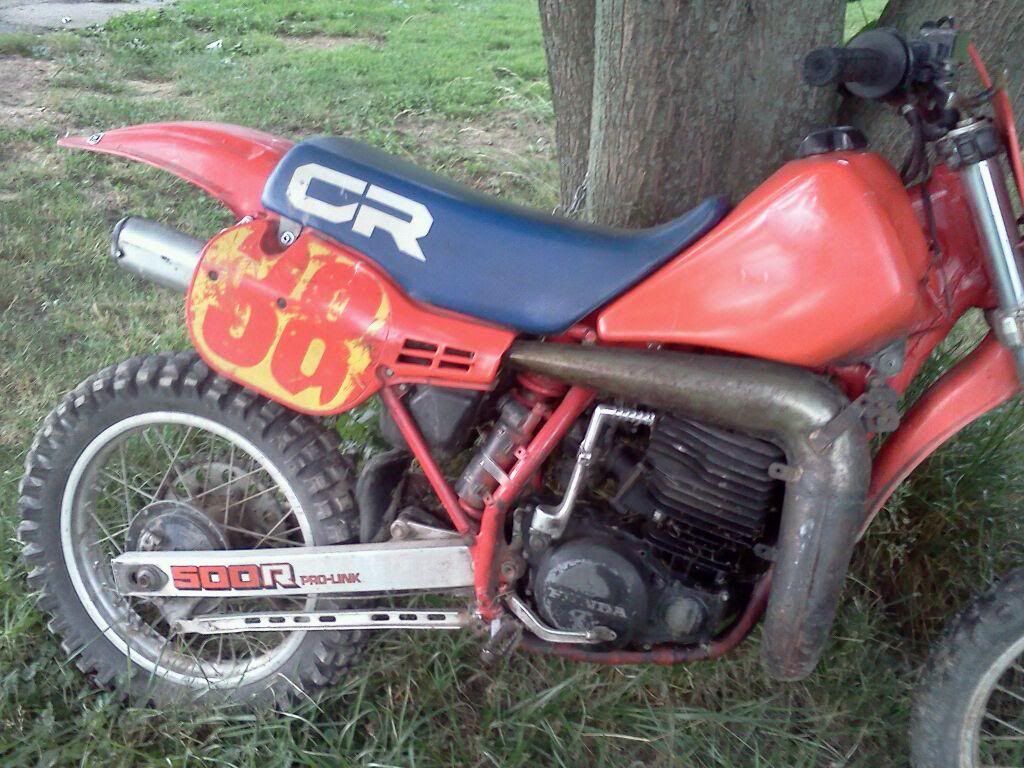
3. DG pipe was welded up by some blind epileptic guy who forgot to turn the gas on.

4. seat looked like a German Shepard used it for a chew toy

5. Air filter bolt feel out and a mouse had taken up residence in the airbox thanks to the rubber nipple being missing. The filter was chewed and there was a wad of hair, misc nesting materials and turds in the bottom of the box.

6. Most of the bike was put together with the wrong nuts, bolts and for some reason I guess its common practice in certain places to use wood screws when a metric bolt of the correct size is not available. There were also the common stripped threads and so bolts were missing altogether.

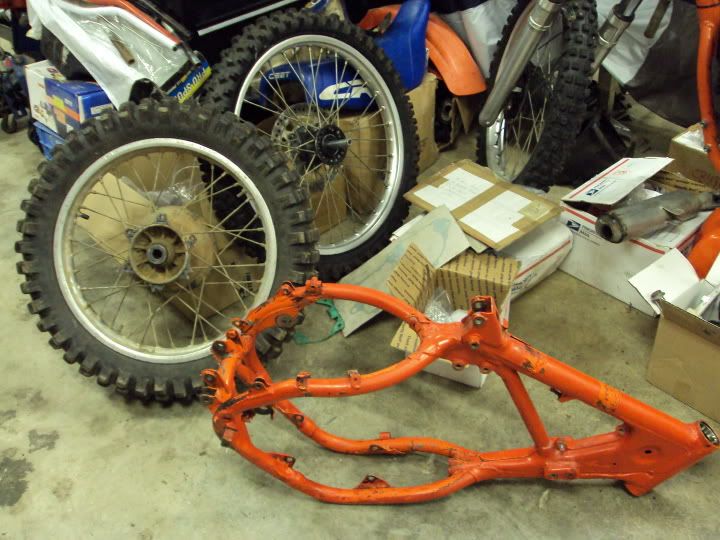
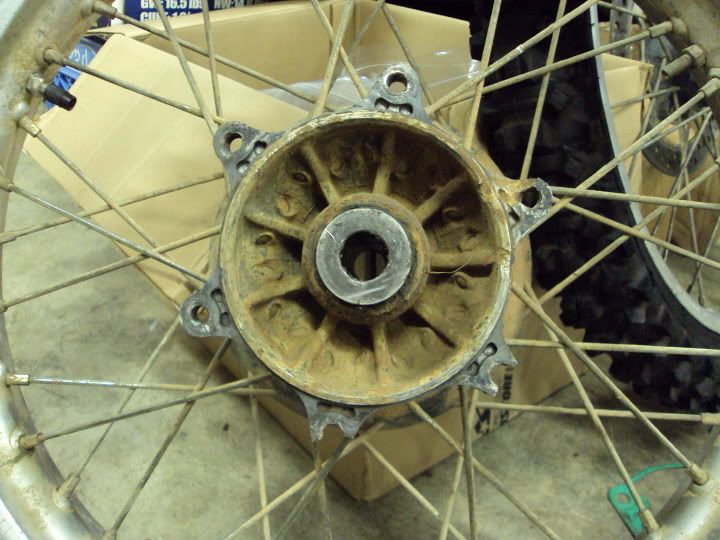
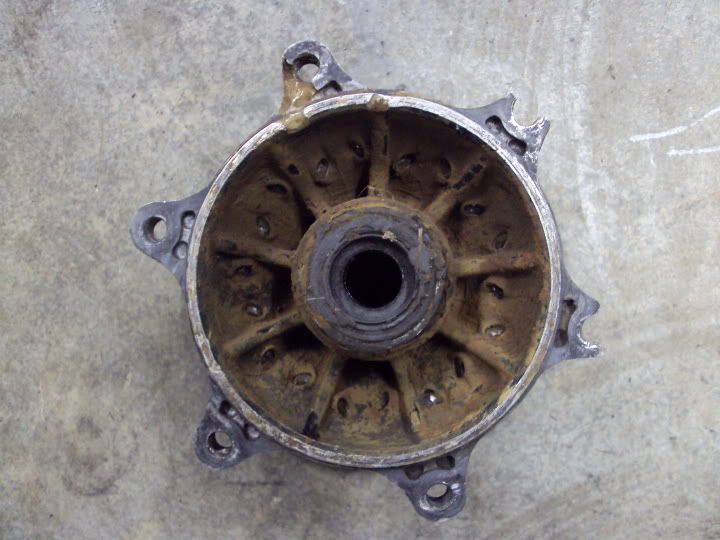
7. The rear hub was pretty much trashed because someone clueless wonder put the taper bolts in the square cut holes in the dual pattern sprocket. They eventually came loose and broke the tabs off the hub. The positive side was it had a new o-ring chain and new sprockets. Sprocket guard / case saver were missing and front sprocket had the wrong bolt and washer on it.

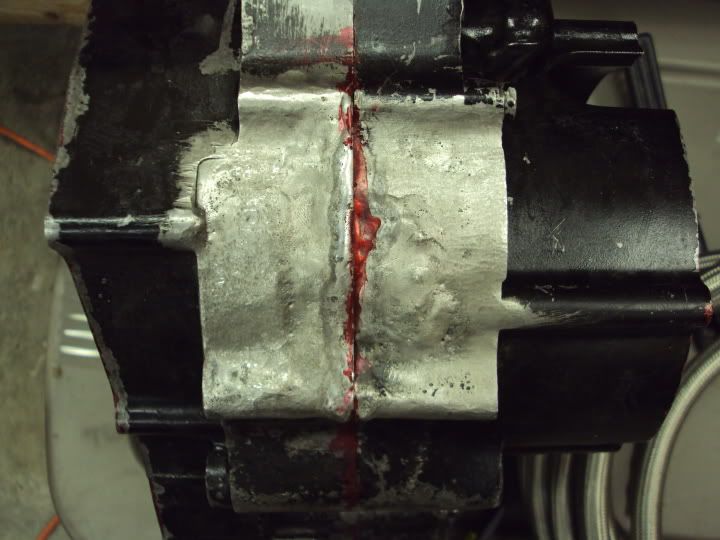
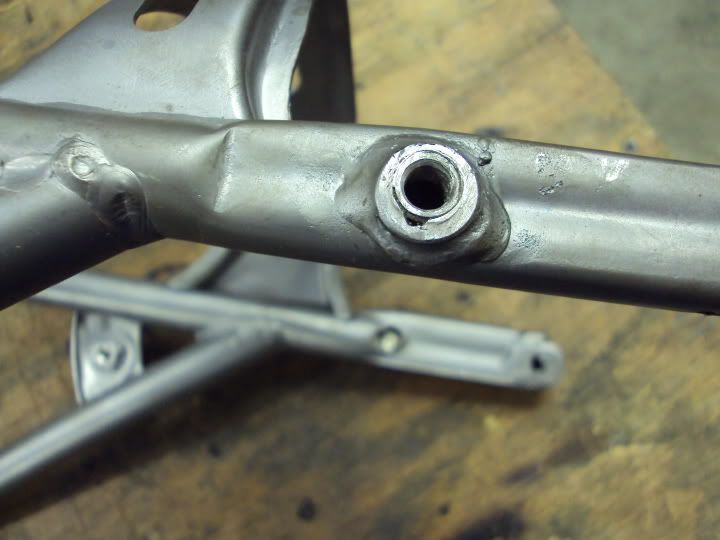
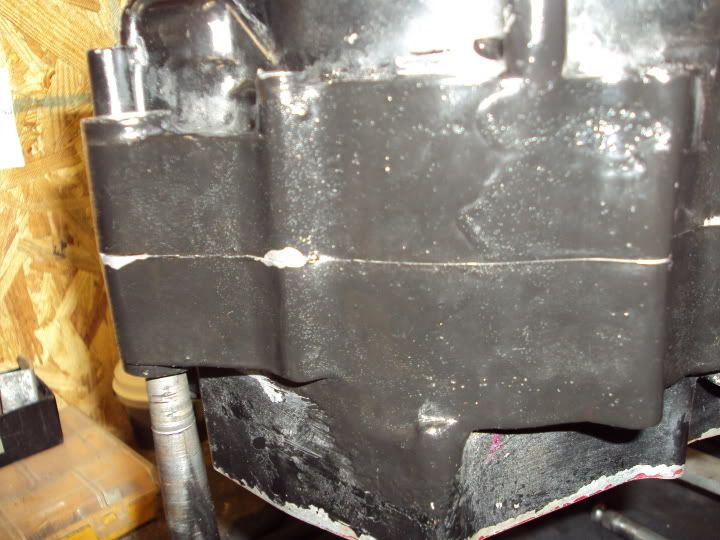
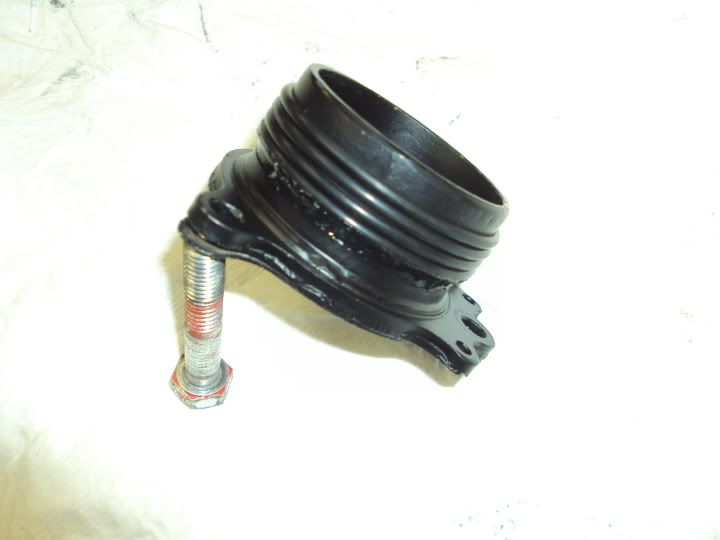
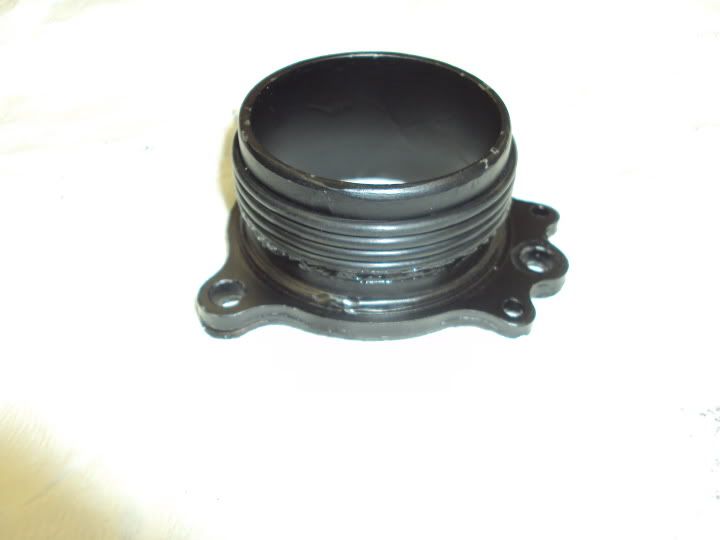
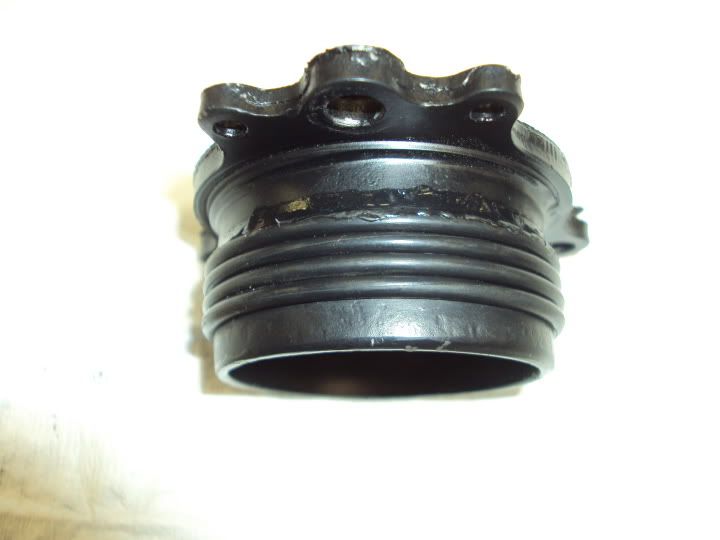
8. The gob of what I thought was oil / dirt / carbon on the front of the engine cases turned out to be two big chunks of aluminum that were welded on to cover up the big hole that the rod knocked out.

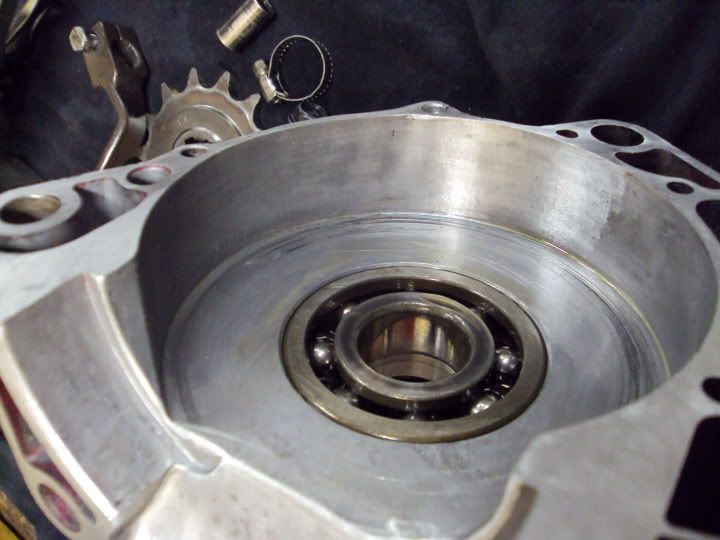
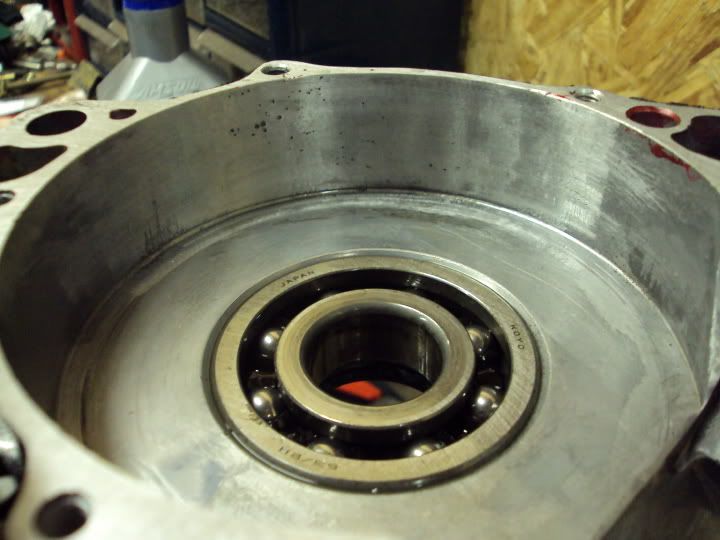
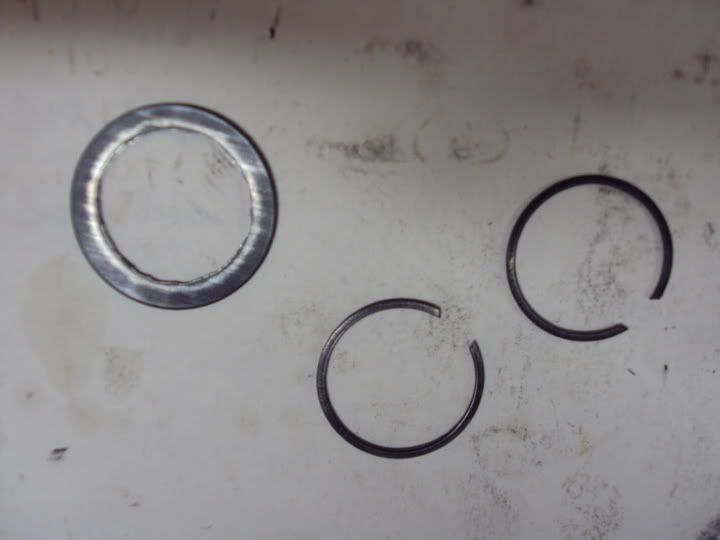
9. Once inside the engine I found two nice pieces of what looked to be ring fragments just about ready to go into the right side crank bearing.

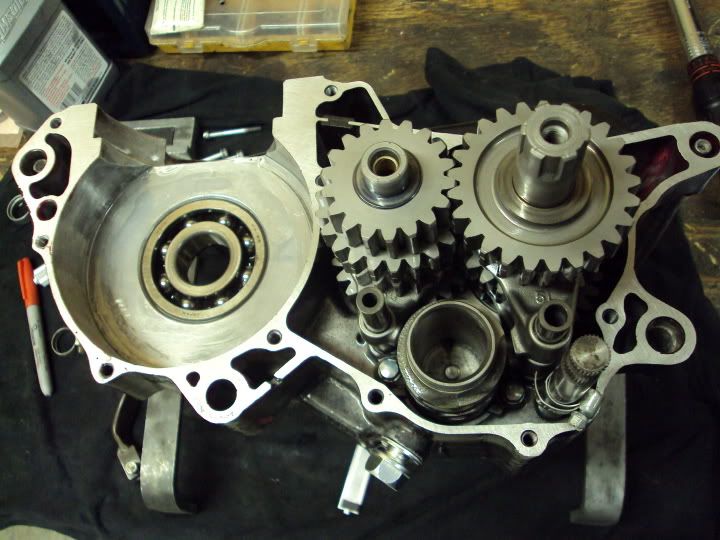
10. Going into the trans I found two wire circlips and a washer / spacer that didn't belong in the gear cluster. Otherwise the trans looked great.

11. The clutch basket was worn beyond belief but the clutches were in new condition. I doubt they ever disengaged.

12. Rear shock was totally gone and the forks were like pogo sticks needing a complete rebuild including bushings. The bike just bounced up and down like it was just riding on springs. If I would have initially test ridden this bike on anything other than a perfectly flat road I believe I would have been in the hospital rather shortly after the crash.

13. Spacers were missing from the read brake hub. It was basically floating around on the axle being held in place by the brake arm and brake shoes.

14. Front brake caliper bracket was cracked in half and the tire was dry rotted.

15. Engine shrouds were missing and it was HELL trying to find a good usable factory set that weren't jacked up in some way.

16. Swingarm bearings / linkage bushings were shot.

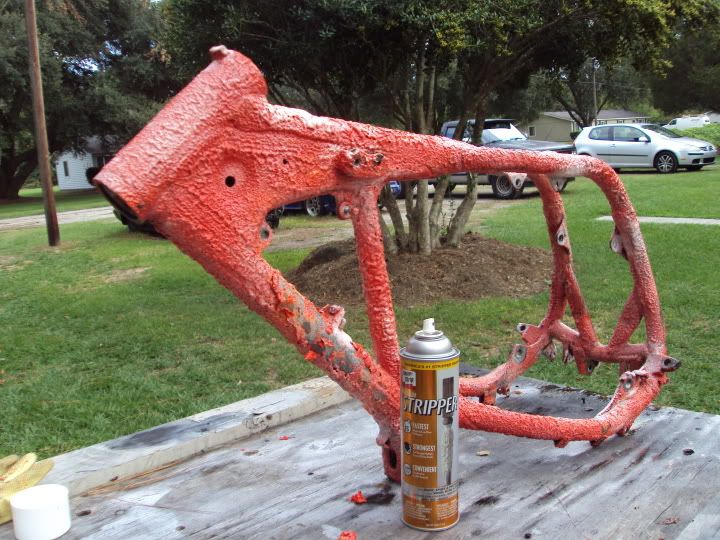
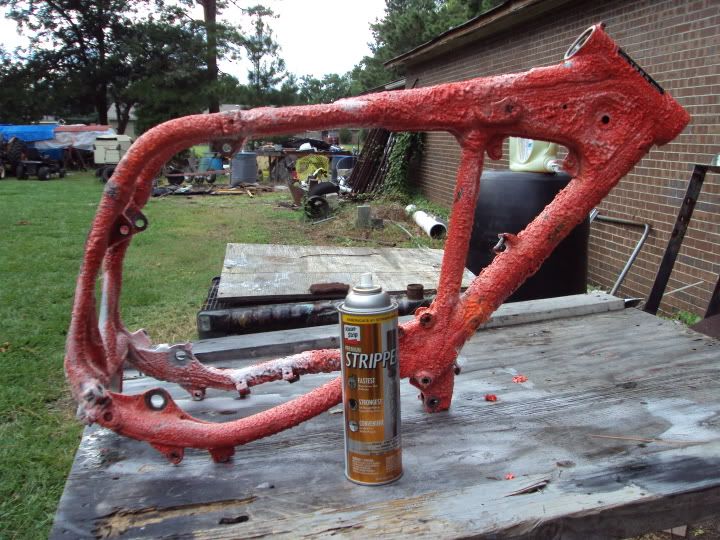
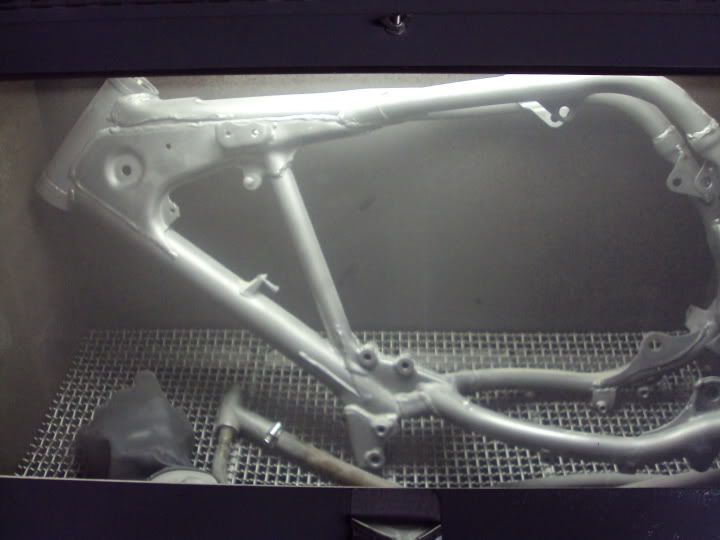
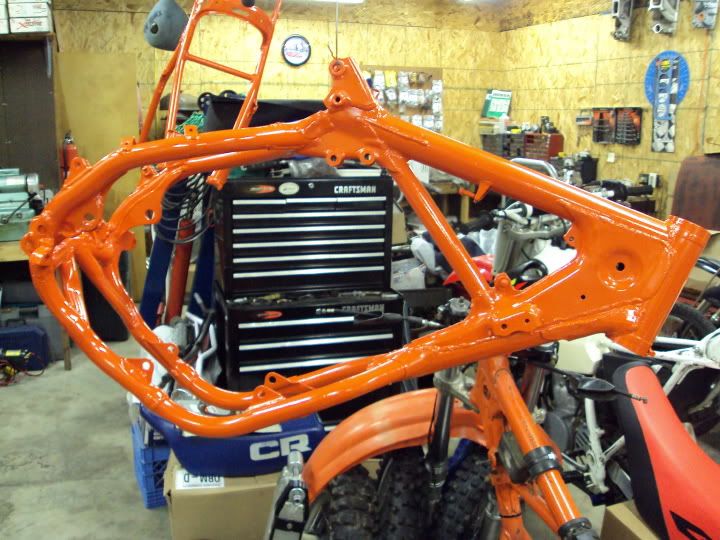
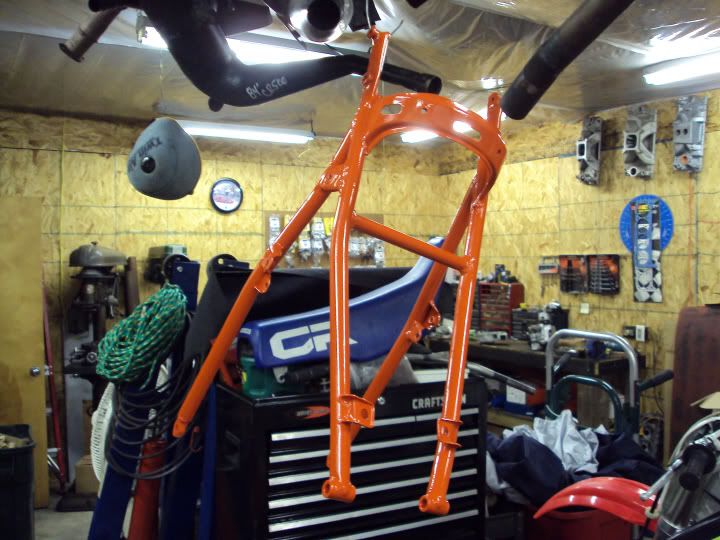
16. And to top it all off someone had taken a can of red paint and sprayed it all over the frame and most everything else attached to it.


I'm sure there was a lot of other things that were jacked up but I just can't bear to think about it any more.

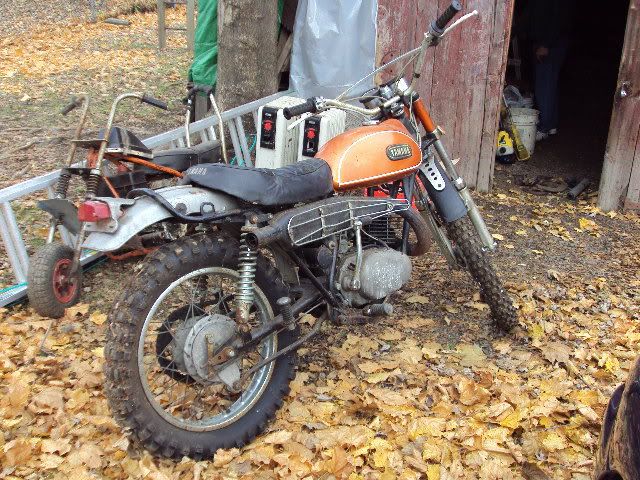
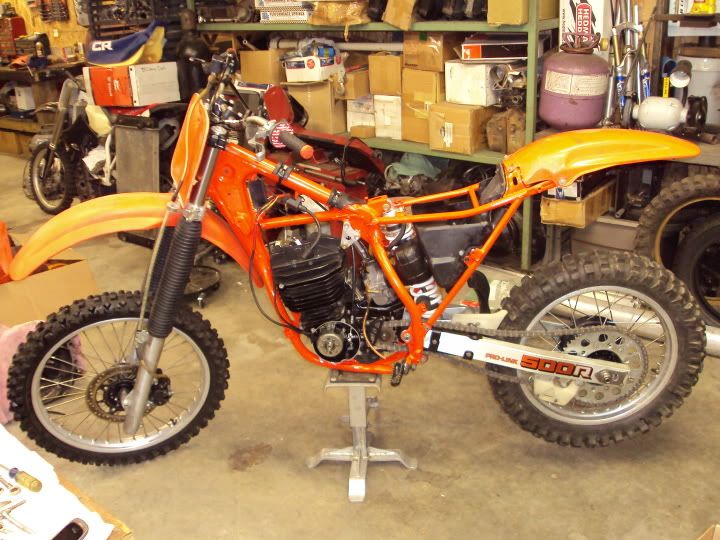
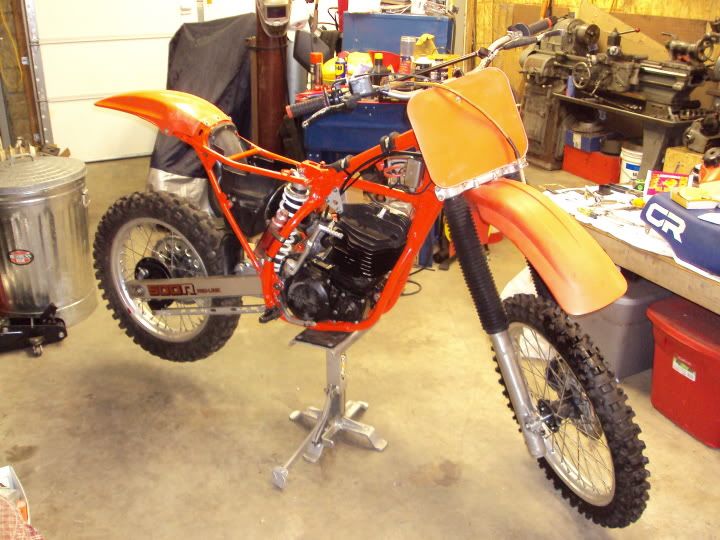
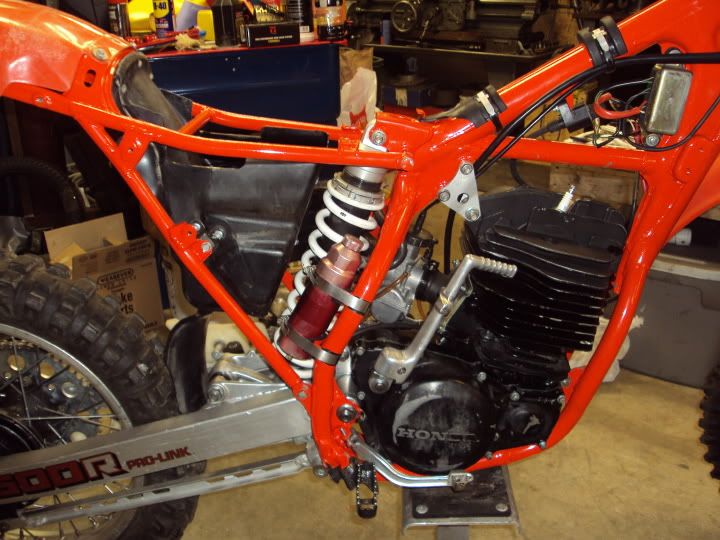
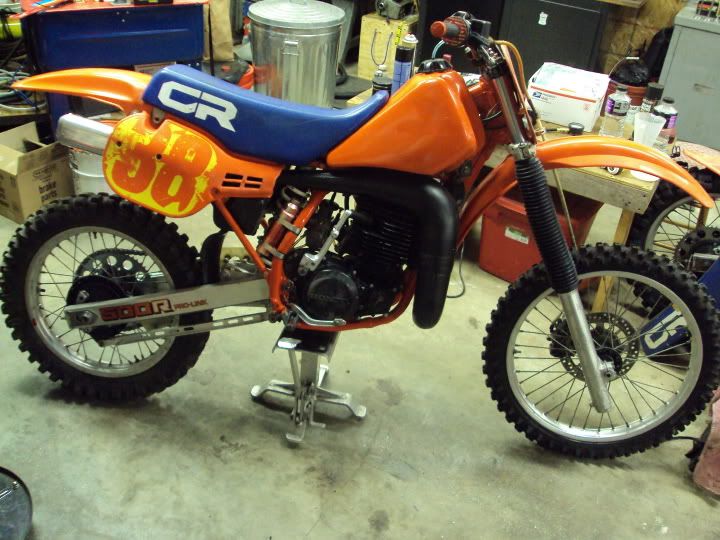
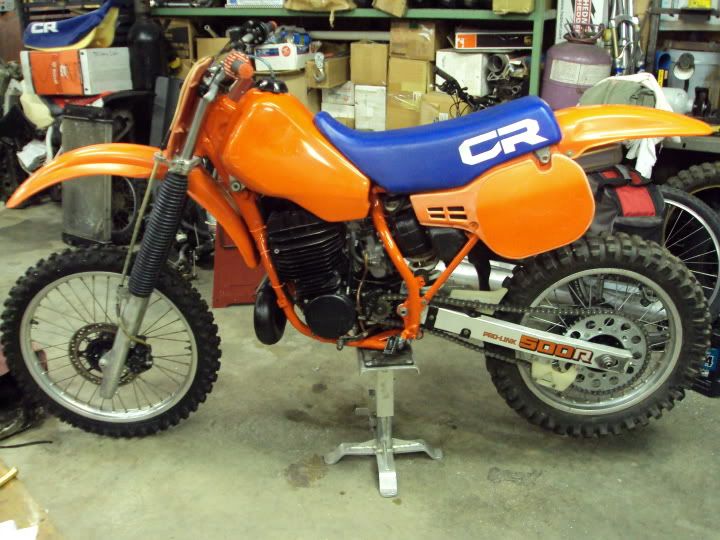
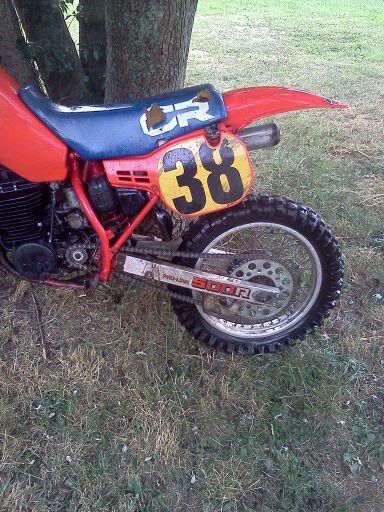
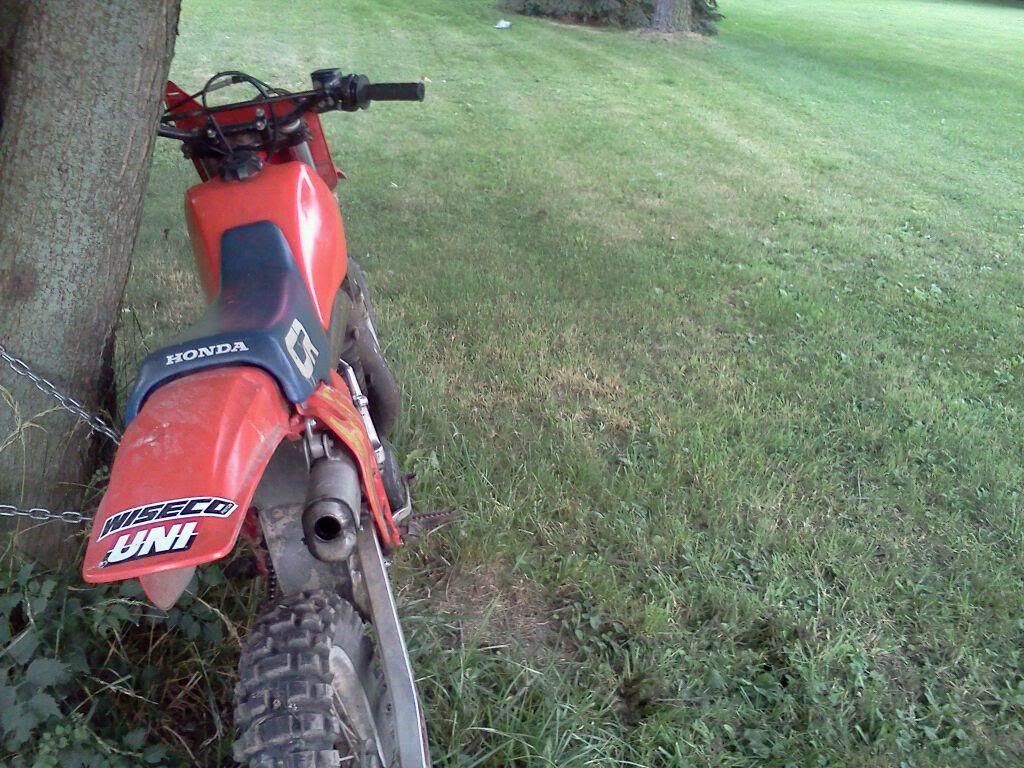
Ok, here are some pics I got before the guy delivered the bike :


Image


Image


Image


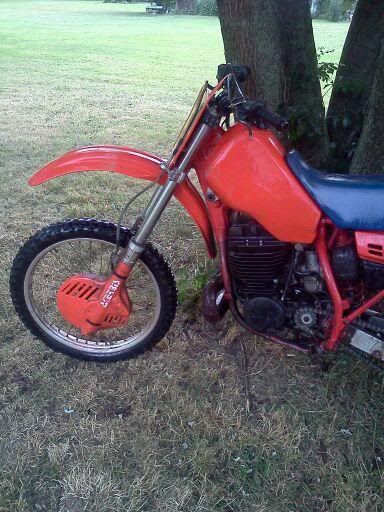
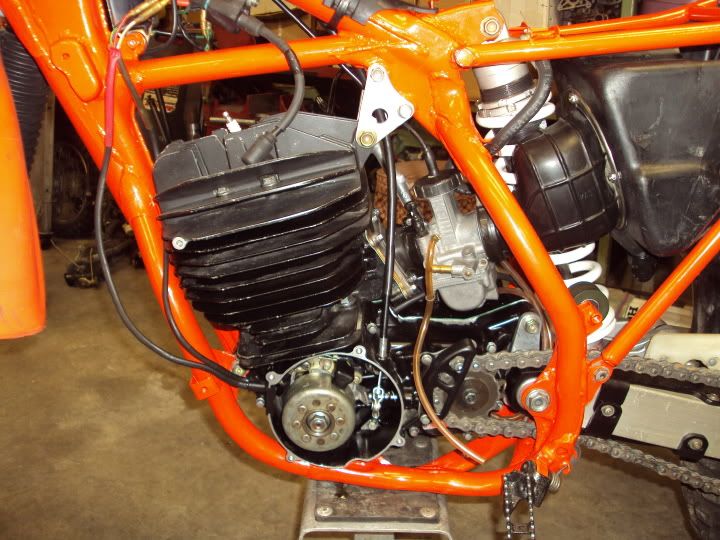
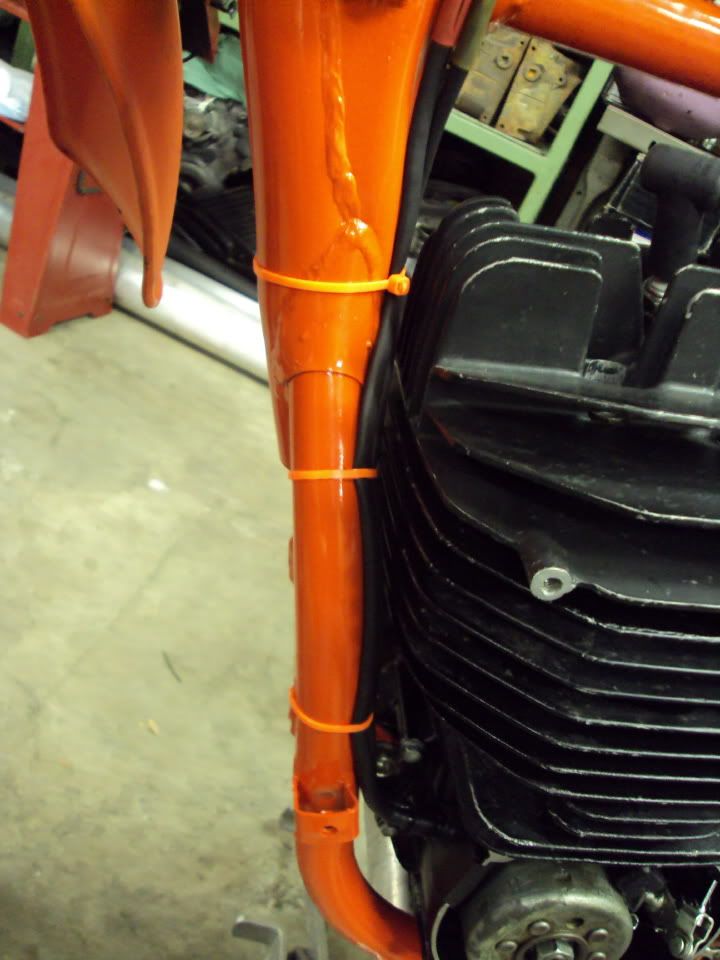
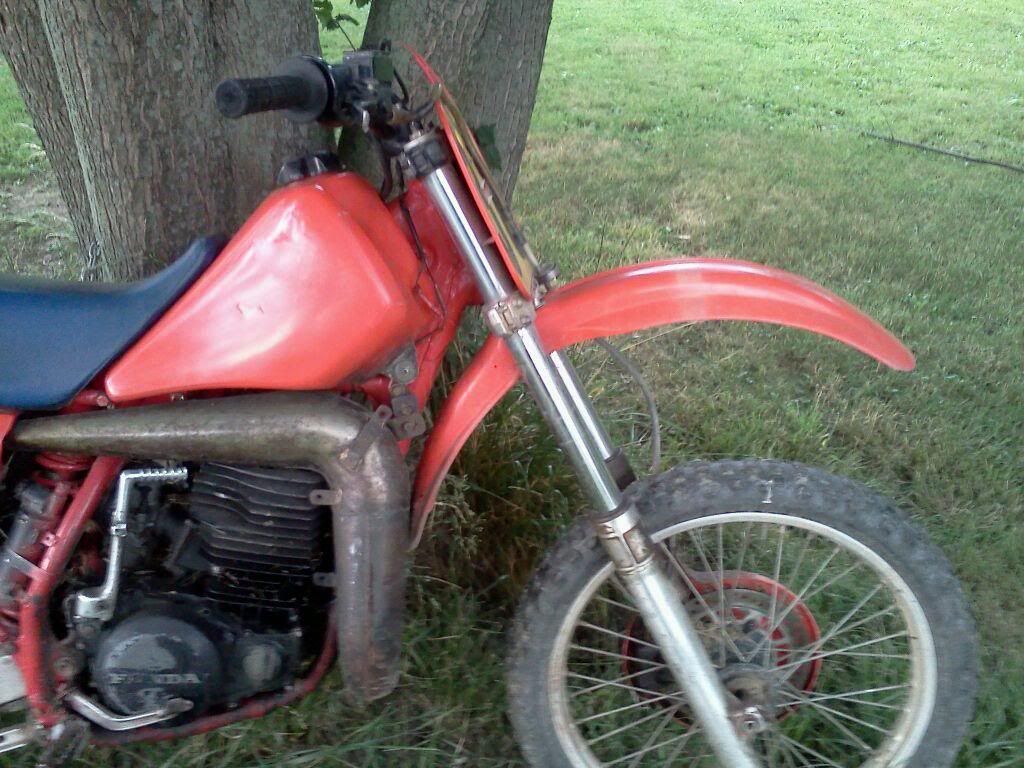
You can see the Stevie Wonder weld job on the pipe
Image


Image


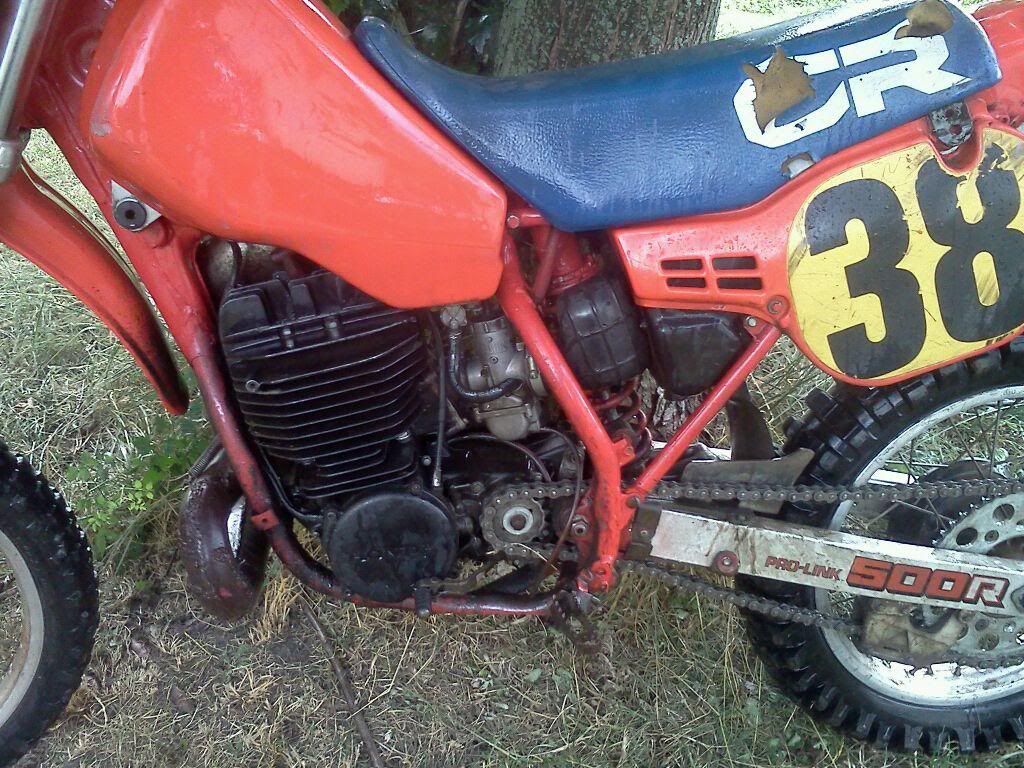
Tank bolt was missing, pipe hanger was held together with a bolt and you can see the gob of JB on the clutch cover.
Image


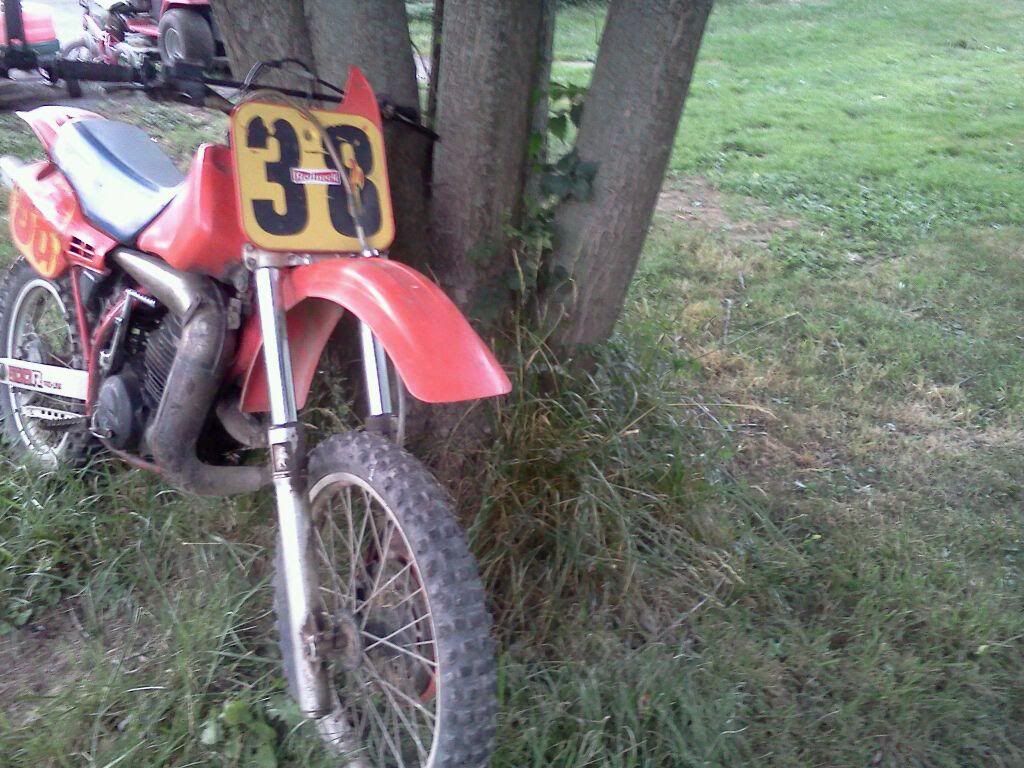
The Sticker on the front number plate says it all...
Image

Image

I'll post up a few more pics later on of the initial tear down and some of the mess I found in the process.
Last edited by BrianPaul69 on March 20th, 2012, 8:48 pm, edited 2 times in total.
BrianPaul69
Posts: 110
Joined: September 11th, 2010, 3:01 pm
Location: Carney's Point, NJ

Post by BrianPaul69 »

The good thing about this bike is I was able to do all the work myself and with the help of members on various forums and E-Bay I was able to gather up the parts I needed to get her back in shape.

Here are a few more pictures of the build :


This is the initial teardown

Image


Closeup of the botched paint job

Image


Trashed back hub

Image


Closeup of removed hub

Image


Engine cases after my initial weld and lap job, this really sucked

Image


Heli-coils galore, this part of the subframe was so bad I had to make an insert out of a fine thread bolt to fit the hole

Image


Paint Stripping

Image

Image


Rear Wheel re-spoked and ready to go

Image


Aside from the runs the case looks pretty good

Image

Image


Got the inside blended in nicely

Image

Image


Trans going back together

Image

Image


A few of the extra parts that someone put in between the gears

Image


Frame getting bead blasted

Image


Frame / Sub-Frame Painted

Image

Image


Engine back on the frame and Swingarm Installed

Image

Image

As far as the engine goes I ended up making a torque plate for honing the cylinder and I'm sure glad I did. After the first few strokes I could see the shadows where the rings were not touching the cylinder. I had to take .001" off of the cylinder wall for it to clean up which is .002" on the bore size making the piston to wall clearance about .007". That is is about .002" more than I care to run so I sent the piston out to Swain Tech for a heavy coating of PC9 which cost a whopping $24.00 plus shipping. They did an awesome job and had a quick turn around. I look at it as a way to get some extra life out of the cylinder and piston plus some added insurance just in case I have a tuning glitch.

I have a member sending me a carb "insulator" boot so I should have this beast ready to breath fire again in another week or two. I'm going to start with the 38mm PJ off my 95 CR500 which worked pretty good.

I'll post up a few pics shortly of where I am now with the front end on.
Rot Box
Posts: 19
Joined: November 25th, 2010, 7:44 pm
Location: Northern Utah

Post by Rot Box »

Oh dang! Lookin great so far :cool:
94 ATK 605DSES (XR killer!)
84 CR500R (EG 520cc, PA suspension with 87 cartridge forks, scotts damper, and FINS!)
User avatar
asteroid500
Posts: 1047
Joined: January 5th, 2009, 1:29 am
Location: Australia Melbourne

Post by asteroid500 »

Nice work man .... but paint stripping & then sand blasting?
ive got a thing for 80's MX bikes at the moment.
"not speeding officer".....qualifying

CR250 97
CR500 AF 99 (in progress)
CR500 AF CR G-4
CR500 1985 true legend
RGV250 96 X2
GSXR600 07 TRACK BIKE
VH Commadore cup car (race)
User avatar
Tharrell
Posts: 1670
Joined: January 27th, 2010, 11:03 am
Location: Mount Airy, NC

Post by Tharrell »

Looks good.
How did you match the paint?
Gonna ride it or race any AHRMA events?
BrianPaul69
Posts: 110
Joined: September 11th, 2010, 3:01 pm
Location: Carney's Point, NJ

Post by BrianPaul69 »

Rot Box wrote:Oh dang! Lookin great so far :cool:

Thanks, its not perfect but looking as good as it needs to for a rider.
BrianPaul69
Posts: 110
Joined: September 11th, 2010, 3:01 pm
Location: Carney's Point, NJ

Post by BrianPaul69 »

asteroid500 wrote:Nice work man .... but paint stripping & then sand blasting?
ive got thing for 80's MX bikes at the moment.

Well, if you saw the mess before I started it was just bad looking. There was bare metal and rust, chipped orange, red paint and red over spray everywhere... I tried to just get the red paint off but started to get aggravated with the process and it was just looking worse. My wife actually stripped the paint off the frame because last time I used the stripper I had more on myself than the parts. The pro strength stripper is a little harsh on the skin too. After that there was still a few rusty spots and areas where the stripper didn't get the paint off and sure enough the frame fit in my blaster. It took a while flipping it around but it was about as clean as it was gonna get. I had a friend spray it for me and I let it hang for about a full week or so before starting to assemble it.

This whole vintage bug started with my mom's 71 DT1 250 that she had since about 1972. I rode it growing up and after college it just sat forever in her garage. The roof started leaking but thankfully she had it covered up so just the lower part of the bike got any moisture damage. 'm also glad I never bothered to change the fork seals because the fork oil all over the front rim saved it.

Here is the bike back in 1972ish with mom and me

Image


Here is the bike two years ago (Thanksgiving 2010) when we pulled it out of her garage

Image


and here it is after my wife and I rebuilt it, I say rebuilt because its not restored. Its about as close to the way it was back in the day when mom was riding it

Image

Image

Image


Mom still had the title so after I transfer it over and get it licensed I'm gonna ride it around this summer. I even got two vintage Bell (Repro) helmets with the bubble shield :D

http://www.thebellstore.com/Helmets/custom500.html

I got the Orange flake for me and the Stunt Limited for my wife.
Last edited by BrianPaul69 on February 19th, 2012, 1:27 pm, edited 1 time in total.
BrianPaul69
Posts: 110
Joined: September 11th, 2010, 3:01 pm
Location: Carney's Point, NJ

Post by BrianPaul69 »

Tharrell wrote:Looks good.
How did you match the paint?
Gonna ride it or race any AHRMA events?
I went to AJ Tucker Auto Supply or you can find it here ( http://ajtucker.com/ ) and I gave the guy the Honda color code (R-119) thinking he was gonna say "what the hell do you want me to do with this??" Well he typed it into the computer and viola, he goes "ahh a Honda color, Flash Red"... I almost fell over. The PPG paint was $50.00 a PINT, hardener was about $38.00 because I had to buy the whole container and the reducer. Its just a single stage urethane paint and you can add a clear if you want. I'm not building a show bike so I opted out of the clear.

You can probably do two frames with a pint if your good but I just did the one and had quite a bit left over.

If your going to use DuPont here is some info I found online somewhere.
DuPont Performance Coatings
Date Jul 28, 2004
Formula Standard # 467271 Formulation Date Oct 18, 1993
Old Stock # / Alt # H9995 / 0 Paint Code R-119
Color Name FLASH RED Lead (Pb) Free Y
Effect N PCP N
US Color Variance Quality K - CHROMABASE BC
Color Owner HONDA MOTORCYCLES Value Shade 1
Price Cost Code - VOC - Activated 0
VOC As Packaged 4.89 VOC Less Exempt 5.56
QC # 241027
Ingredients
Quantity To Mix
1 PINT (100.0% Fill)
Ingredient Display
Units GRAMS
Ingredient Ingr
Quality

Description Amount Accum. Amount
843 J BRIGHT YELLOW 166.6 166.6
850 J BRILLIANT RED 37.0 203.6
801 J HS WHITE 8.3 211.9
150 K B/C BALANCER 233.0 444.9
I just want to say that after painting the frame you should know its not going to take a lot of abuse. I chipped a bunch of spots just getting the engine and swingarm into the frame. I have a local powder coater that I'm going to work with on the CR480 I'll be building next. He claims hundreds of colors and can even send out for a perfect color match (costs extra) if that's what you wanted.

http://livewirepowdercoating.com/

A friend at work uses them and he paints some pretty custom Harleys like the one in the pic on their site. He is VERY particular about his work and said thats the only place he uses.

I might try to get into a few AHRMA vintage events but there aren't any near where I live that I know of. I heard that there is one in Georgia but haven't really looked into anything closer.
Last edited by BrianPaul69 on February 19th, 2012, 1:29 pm, edited 1 time in total.
User avatar
Tharrell
Posts: 1670
Joined: January 27th, 2010, 11:03 am
Location: Mount Airy, NC

Post by Tharrell »

I bought paint for my '85 from colorrite, same number.
There's an AHRMA national in Sanford NC, Axton VA and one in West Virginia.
btw-What year is your 480?
I have an '82 model.
The trick to getting the bike back together after painting is to use tape to protect the surfaces. The engine is a real booger to get in and out.
BrianPaul69
Posts: 110
Joined: September 11th, 2010, 3:01 pm
Location: Carney's Point, NJ

Post by BrianPaul69 »

Tharrell wrote:I bought paint for my '85 from colorrite, same number.
There's an AHRMA national in Sanford NC, Axton VA and one in West Virginia.
btw-What year is your 480?
I have an '82 model.
The trick to getting the bike back together after painting is to use tape to protect the surfaces. The engine is a real booger to get in and out.
I checked with colorrite a while back and was going to just get two rattle cans but decided to buy the PPG locally. Yeah the tape would have helped a lot... live and learn.

My CR480 is an 83, you can sort of see it in the picture behind the main frame hanging up.

I'll check into the Sanford meet, its about 2.5 hours away but probably the closest I'm gonna find.
User avatar
Tharrell
Posts: 1670
Joined: January 27th, 2010, 11:03 am
Location: Mount Airy, NC

Post by Tharrell »

Lake Sugartree in Axton is Gary Bailey's track.
He lives there too, cool guy.
It's worth it to get there.

http://www.lakesugartree.com/
User avatar
mightyhammer
Posts: 42
Joined: May 26th, 2011, 9:37 am
Location: Lewiston, ID.

Post by mightyhammer »

Superb worksmanship! That Yammy turned out beautiful! You and your wifey sure did a good job and I can't wait to see the '84 when she's done!
BrianPaul69
Posts: 110
Joined: September 11th, 2010, 3:01 pm
Location: Carney's Point, NJ

Post by BrianPaul69 »

mightyhammer wrote:Superb worksmanship! That Yammy turned out beautiful! You and your wifey sure did a good job and I can't wait to see the '84 when she's done!
Thanks for the kind words on the Yammie :wink: That bike was quite a project and a struggle from start to finish. Even though it only had about 2800 miles on it since new every part had to be taken apart, cleaned and refinished in some way. Even the key switch had broken wires underneath so that was totally disassembled, cleaned, new silver sleeving was put over the wires and then all the wires were soldered back on. The biggest struggle was fighting the urge to make it look too good because the goal was not to make it look new but just look good for its age. I'm pretty happy with the results.
BrianPaul69
Posts: 110
Joined: September 11th, 2010, 3:01 pm
Location: Carney's Point, NJ

Post by BrianPaul69 »

Well it's been raining for most of the weekend so my big plans of firing up the old beast for the first time have gone out the window. Here are some new pics of the progress :


I haven't spent much time on the plastic yet other than cleaning and getting the 14 coats of yellow background paint off.

A little tip if you ever get an old bike and the plastic has that white sun faded look to it. Glass beading with a very low pressure takes it right off and leaves a dull but uniform finish. Then you just polish it out and it looks pretty good.

Image

Image


I haven''t decided if I want to paint the backgrounds the factory yellow (its not my favorite color), green (I like green even less than yellow) or just black...

Image


The stock plastic cover is looking like its been through hell and didn't make it back. I was thinking of going with a Service Honda billet ignition cover but from what I remember they went up ALOT!!

http://www.servicehonda.com/service-honda-branded-parts

They are now $150.00 so I'm probably just going to get a Boyesen cover for $80.00 and be done with it.

You can see the PJ nicely mounted with the carb boot I got from hillclimbjim. It's really great to have guys willing to help out.

Image


Here is the WP Shock all stuffed up in there and ready to go to work. I just have to put the trans oil in, install the gas tank and shes ready to irritate some neighbors :D

Image


This bike has really proven to be a challenge to my skills in about every way. I don't think there was a single part that just went on without some sort of issue.

1. Went to install the front hydraulic brake assembly and after the first squeeze it was nice and firm. I thought to myself "man that's sweet" now on to the next thing. Hahahahaaaa, not a chance... I went to spin the front wheel and it was dragging like hell. One of the caliper pistons was working good and the other was sticking. Back off it came and after a tear down I saw the corrosion ring up inside. After a little scraping and polishing we were back in business and I have to say it bled out way easier than I had expected.

2. Installing something as simple as installing a new set of chain rollers turned into an unbelievably tedious task. I would have honestly preferred to rebuild the trans again... The chain rollers I got were the All Balls and they were both like roller skate wheels. They came nowhere near fitting (width or OD) on the upper or lower so I ended up just using the OEM roller up top with the bearings from the new one. When I pushed the new bearings out surprise surprise the inner bearing sleeves stuck about 1/4" on each side instead of just using a spacer in between. It was a good design just not for what I was doing. I had to machine the hardened sleeves down to get the right width for the OEM roller and after about an hour the upper was done.

The lower was a real mystery because I was told that both the upper and lower rollers were the same diameter. If they were there the roller touched the swingarm so there is NO way the chain would ever fit between the swingarm and the roller. After turning down the width and the OD several times I ended up with the lower roller slightly over 1" in diameter, just about an 1/8" more than the bearings.


3. I'm using a Pro Circuit pipe and I saw that some people are buying that fancy billet aluminum exhaust flange with the o-rings.

http://www.eddie-sanders-racing.com/pro ... flange.htm

I was going to go that route but to my surprise the Pro Circuit pipe already has a larger diameter flange on it so there was a big gap between the cylinder flange and the pipe flange. I was able to find several o-rings that fit perfectly and it had a real nice snug slip fit. Now I can save that $50.00 for more beer and asperin.


Image

Image


I used a bead of the Super Glue gel behind the inner o-ring because it wanted to push in when I installed the pipe.

Image


Here's something I found at Wal-Mart that was pretty cool were these neon zipties. They have them in 4" and 8" so I got both packs.

Image

The neon orange offsets the flash red paint really nice :)

Image


Well that's all for now, my wife is waiting on me since this is our day out together and with the look on her face she about out of patience waiting on me :o
BrianPaul69
Posts: 110
Joined: September 11th, 2010, 3:01 pm
Location: Carney's Point, NJ

Post by BrianPaul69 »

Well its been a while since I posted anything on my project but with work and family I haven't had a lot of time to do much. Last week I finally finished putting the rest of the plastic on and wrapping up the rest of the loose ends. When it was time for her first crank up it was a a miserable experience to say the least. This thing has so much compression all my 170 lb ass could muster was a single kathunk... kathunk... kathunk...

After about 10 minutes of that I actually got it to fire up one time... by accident... and it ran for about 10 seconds and then stalled. I tried again to start it but my was was so sore at that point I couldn't give it a good strong kick. To help thinks along I decided to pull the head, do the head mod and install a compression release valve.

After all that I get the head back on and give it another go. This time it's much easier to kick over but it still took about 5 minutes to get it to crank over. I finally get it started and warmed up and everything sounds really good so I slap on the helmet and take her for a spin up the street. After she gets some good heat in her I'm starting to hear something about 1/4 throttle that doesn't sound really good. Then I realize its the ping of death and its getting worse to the point I can't even give it any throttle.

When I got it back to the shop it had the high bouncing idle and I can tell its running real lean. Ok, pull the carb back off and see what we have in there. Since I didn't an 84 service manual I jetted it going by my 95 CR500 manual and realized that wasn't going to work. Just to clarify I'm running a 95 CR500 PJ carb. The book was saying a 55 pilot and 170 main but they weren't even close. Hillclimb Jim came to the rescue again and gave me some numbers that turned me in the right direction. Here is what I ended up with :

Needle : 28N (out of the 84 CR500 PE Carb)

Clip Position : #4 (down from top)

Main : 175

Pilot : 68

Air Screw : 2 turns out

It also has the 95 CR500 reed cage and Boyesen reeds.

A little side note for those that may not know this the Keihin jets are sized by the hole diameter not by wet flow. The hole is also metric so a 170 main actually has a 1.7mm hole in it and a 55 pilot has a .55mm hole in it. Now my problem was that I don't have a big selection of jets to play with so I dug out my really little drill set with the 61-80 number bits. If you are ever in a pinch and just so happen to have a set of tiny bits you can make your own size jets.


Here's how it goes :

Take the size of the jet : 55 pilot

Then convert that to millimeters : .55

Then use the millimeter to inch conversion multiplier : .03937

Then multiply the jet size by the multiplier : .55 x .03937 = .0216"

The .0216 or about .022" is the size of the hole in the jet. Now say you need a 68 pilot then you just do the math.

.68 x .03937 = .0267 or a .027" drill bit. Just be sure you re-mark the jet with an engraver so you don't get all hosed up later on.

Here is a cool conversion chart that shows fraction, decimal, wire number and metric. Print it out and keep it in your tool box ;)

http://www.csgnetwork.com/drillsizeconvert.html

There are two different drill sets that cover all the small sizes on the chart :

Metric 0.3mm - 1.6mm Drills :

http://www.ebay.com/itm/310386628215


Wire / Number Drills (USA Made) :

http://www.amazon.com/dp/B000GH6X3K/?ta ... rsaw-08-20


Plug Pin Gauge Set 0.011-0.060" (to check your work) :

http://www.ebay.com/itm/370594361303


After all that I get the carb back together and with two kicks she fires right up!!! This time it sounds really good, nice amount of smoke out the back and its idling pretty good too with no high bouncing idle. I give her a few minutes to get warm and take another shot up and down the road. This time I can immediately feel that this thing has some serious power. Just rolling on the throttle in any gear past 2nd and the front tire is coming up even with me leaning way over the gas tank. When I got it back to the shop I gave it a try starting it hot and it started one kick every time even without the compression release. I have to say I'm pleased with the results of this project so far.

This runs a lot different than my 95 and takes a little more rpm to smooth out and start pulling. I may be able to clear some of that up by lowering the needle one clip but I didn't have time to do any more today.

Well here are a few pictures of where I'm at now.


Image


Image


I still need to put the tank stickers on and get the air shrouds mounted but the Pro Circuit pipe doesn't have the brackets to mount the right side. I might just leave them off for now because it was a MAJOR pain in the ass to find nice originals and I'd hate to screw them up.

Its sort of funny, well not really but the only thing I didn't take off was the rear tire and wouldn't you know it the damn thing leaks down overnight!!! Somehow I knew it would.

I'll post up a few more pictures when I get it all done and I forgot to get one of where I put the comp release ;) Its a perfect spot and you can't even tell it has one.

To be continued........
User avatar
mr500
Posts: 99
Joined: July 30th, 2010, 3:02 am
Location: Sydney Australia

Post by mr500 »

Wicked resto mate,it really was worth all the time and effort.
You now have a real mans bike. :D
Keep it real, Keep it steel.
User avatar
mightyhammer
Posts: 42
Joined: May 26th, 2011, 9:37 am
Location: Lewiston, ID.

Post by mightyhammer »

Sure glad you posted up your carb upgrade. I am about to do the same upgrade and you just saved me a buttload of homework! thanks!
BrianPaul69
Posts: 110
Joined: September 11th, 2010, 3:01 pm
Location: Carney's Point, NJ

Post by BrianPaul69 »

mr500 wrote:Wicked resto mate,it really was worth all the time and effort.
You now have a real mans bike. :D

Thanks for the compliment, it was a lot more than I had anticipated getting into. Funny thing when I bought the bike I thought I could just clean it up and go riding... :lmao: No such luck..

I'm going to be very cautious with this thing because I can tell immediately its not the mild mannered animal I'm use to riding (95 CR500). Hopefully if we don't get any rain I'll take it out this weekend and terrorize the local ATV park ;) all 4000 acres of it. :whoop:
BrianPaul69
Posts: 110
Joined: September 11th, 2010, 3:01 pm
Location: Carney's Point, NJ

Post by BrianPaul69 »

mightyhammer wrote:Sure glad you posted up your carb upgrade. I am about to do the same upgrade and you just saved me a buttload of homework! thanks!
Glad to see it will help you out. There's nothing better than having everyone sharing this info to help get these old dogs back up and running. Do you have an 84 CR500? This 84 needed a lot of fuel down low from idle to 1/4 throttle probably because of the air cooling, compression and port timing. I also have that Pro Circuit pipe on there so that might effect things too.

Here is where I got the jets just in case you have a local shop that triple charges you like the place I have here. I believe everything he sells is also free shipping.

Ebay seller ID - partsdepotatv

http://www.ebay.com/sch/m.html?_nkw=jet ... tsdepotatv
User avatar
mightyhammer
Posts: 42
Joined: May 26th, 2011, 9:37 am
Location: Lewiston, ID.

Post by mightyhammer »

Yes, I also have an '84. I picked it up a few years back from a young fella who wanted to upgrade for $450.00. It was in fair shape and had the forks upgraded to the inverted version. Verdict is still out on which model/year of bike they came from, but work and handle very well. I have done a few upgrades, but not quite ready for a full resto, as it is my favorite bike to ride. I will be upgrading to a later cr250 ignition system eventually. First is the carb upgrade. I have a PJ from a '95 that I will be installing here in the next few weeks. The tank and side plastics are in great shape, but both fenders need replaced. Got some aftermarket shrouds. Left is installed, but I need a new pipe before i mount the right side. I installed some risers for the bars, as I am kinda tall/ big so I am opening up the cockpit some as well. I will be doing an upgrade on the pegs soon as well. I need to get some better pics and I will post if you'd like.
User avatar
mightyhammer
Posts: 42
Joined: May 26th, 2011, 9:37 am
Location: Lewiston, ID.

Post by mightyhammer »

I also ordered a new seat cover a while back, hasn't come in yet. By the way, I appreciate you posting the addy's of people who you have found helpful. Like I said, saves me a bunch of homwork! I am a gunsmith by trade and am pretty backed up usually so I don't get a lot of time to run around or research the stuff I need for projects such as this... When I say I appreciate your work I REALLY mean it.....LOL
BrianPaul69
Posts: 110
Joined: September 11th, 2010, 3:01 pm
Location: Carney's Point, NJ

Post by BrianPaul69 »

No problem with the info, I'm always glad to help. If you have any specific questions feel free to ask.

That would be awesome if you posted some pics of your bike. I don't think there are enough people sporting the old iron.
User avatar
mightyhammer
Posts: 42
Joined: May 26th, 2011, 9:37 am
Location: Lewiston, ID.

Post by mightyhammer »

Well, it stands to figure I rekon... Pulled the carb off to swap and noticed the piston had some scoring on it so it looks like I might be doing a build sooner than expected. Pulled the jug off and looks like I caught 'er before anything major grenaded. Con rod wobbles around like its on a pivot...lol Yup, thanks alot Brian, its all your fault! I might need to rattle your cage to find out where you got all your overhaul parts. I'm probably going to send my jug and head off to roosty for the piston work and a relief valve. Bike was hard to start from time to time, but other than that not much sign of the piston/rod bearings gone bad. Looks like I need to finish up the 95 if I want to ride this spring!
BrianPaul69
Posts: 110
Joined: September 11th, 2010, 3:01 pm
Location: Carney's Point, NJ

Post by BrianPaul69 »

Well I had the old iron horse out last Sunday and aside from being a real bitch to start cold she ran great but after its warmed up one kick is all it takes. I have to say this bike is a blast to ride and it drew some attention from the 4 stroke crowd. Most of them didn't know what it was and when they realized it was a 2 stroke not to mention a 500cc 2 stroke they sort of didn't want to ride with me much.

Apparently during the overhaul I overlooked the fact that the rear sprocket was a 52 tooth so it rendered 1st, 2nd and most of 3rd gear useless. I spent most of the day riding a 2 1/2 speed and it pretty much top'd out so fast it almost wasn't even fun on top end. I have a 48 tooth coming which should really straighten things out a bit. The only issues I have with the way it runs and I'm not sure if this is even an issue but the bike pings just a bit right off idle. WOT it just screams, mid throttle is great but no matter if your in 5th going steady down a long straight or just putting around off idle in 2nd it has a slight ping to it. I tried to get a little 110 to mix in there and see if that cleared up the ping but the place was sold out. I also run the ethanol free 93 octane at about 32:1 mix. I'm hesitant to up the 68 pilot any more because it loads up just a tad if I idle around too much. I also have the 28N needle in it now and was thinking about going back to the stock 95 PJ needle.

One other thing that could use a little improvement are the forks. Compression is good but the rebound will throw you right off the bike if you hit something like a large root or something that compresses the forks really fast especially if you need to slow down really fast afterwards... It caught me off guard one time and I ended up going through some bushes trying not to wreck. It was still fun though :lol:

Anyway, after about 3 hours of riding I had zero issues with the bike (aside from needing an M5B on the back) and I didn't even need the spare plug :D

I'll get the finished pics up as soon as my wife gets back with the camera. She went on a little trip and took it with her along with my pictures. I welded the brackets on the pipe so the air shrouds are on and i had a little problem with the tank stickers. Seems they don't like the fuel vapors that keep seeping out through the plastic tank so they bubbled up pretty bad. I'm trying to figure out a way to get them to not bubble up and its a toss up between painting the tank under the sticker with that Fusion plastic paint or buying the $65.00 3M "EC-776" Scotch-Weld™ (aka Scotch-Clad ) Fuel Resistant Coating. Damn this shit gets expensive.
User avatar
mightyhammer
Posts: 42
Joined: May 26th, 2011, 9:37 am
Location: Lewiston, ID.

Post by mightyhammer »

Hey B, any updates?
Post Reply