Page 3 of 4
Posted: August 4th, 2011, 12:01 pm
by coley13
AlisoBob wrote:Weld it with everything shimmed and bolted into their final position.
OK, thanks Bob. Will do
Posted: August 4th, 2011, 12:07 pm
by coley13
The clamp is called a "super clamp". You should be able to get one at any industrial hardware store.
There is a huge variety that look a little differnt to others but all fit for the same purpose
Posted: August 4th, 2011, 12:51 pm
by hoofarted
Posted: August 4th, 2011, 6:27 pm
by coley13
frames finished, time to start putting the bike back together. Total invesment for conversion $48.50
i think i'm going to kick back and have a beer..
Posted: August 5th, 2011, 1:59 pm
by coley13
AlisoBob wrote:Weld it with everything shimmed and bolted into their final position.
i did as you said, BUT when i picked my frame up from the welder the engine was pulled out and sitting in a box... I was thinking WTF. These holes better line up. There was some slight movement too but luckily i could get the bolts back in. Must say i was not impressed..
Anyway we got lucky, could of stuffed it all up right there
Posted: August 5th, 2011, 2:51 pm
by Roostius_Maximus
It needs to come out to weld the backside

Posted: August 5th, 2011, 3:09 pm
by coley13
Roostius_Maximus wrote:It needs to come out to weld the backside
edit, just went and had a closer look. I was thinking you could pull the nut and push the bolt through, flip the bolt and do the other side the same so there is always a bolt in there before the contraction.. little too close fit near clutch cover front bolt
Anyway doesnt matter now, it's done
Posted: August 5th, 2011, 3:43 pm
by coley13
actually having a closer look i can understand the limited space of the lower right mount.. hence pulling the motor.
I think this where a properly made JIG would me much better suited than empty engine cases
Posted: August 5th, 2011, 9:32 pm
by gregrobo
we tack ours up with the motor in place then rempve it and bolt the jig in place how else do you think we get the tig torch in there to weld it up
Posted: August 6th, 2011, 12:39 am
by coley13
good for you, do you want an award ? i didnt realise. get over it..
the fact is the frame moved during welding process. Got lucky and moving along
Posted: August 6th, 2011, 1:16 am
by gregrobo
got a bit butt sore mate. they all move a bit, if your welder was smart he would have put spacers in the engine mounts after removing your engine all is good have another beer
Posted: August 6th, 2011, 1:29 am
by coley13
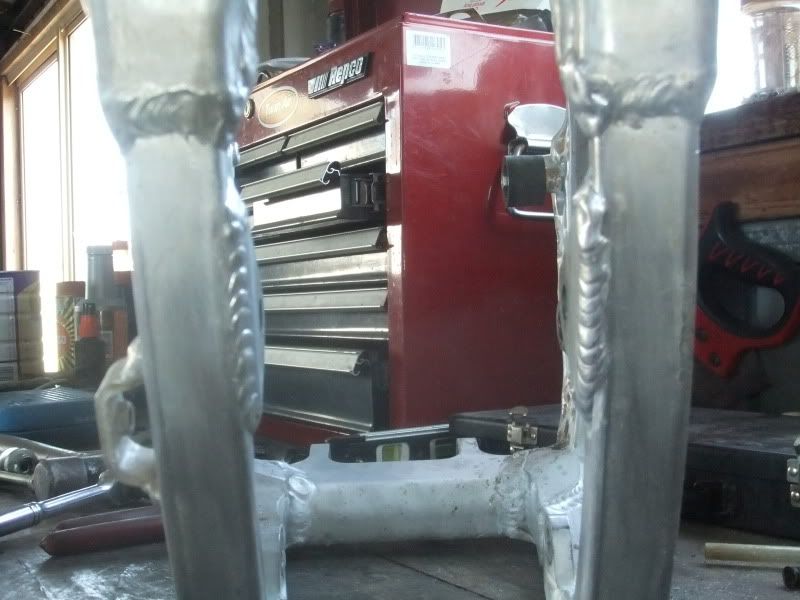
when the suspension is topped out the spring touches the engine cases, this needs clearancing a little.

Posted: August 6th, 2011, 1:39 am
by coley13
gregrobo wrote:got a bit butt sore mate. they all move a bit, if your welder was smart he would have put spacers in the engine mounts after removing your engine all is good have another beer
well no, this is my first build. I think i'm doing alright thus far. Saying that i've been getting a few roll eye's latetly both here and other site. I'm living and learning as i go just like you blokes with you first time.
I just want to share my build and hopefully help others who may not wish to attempt it as it may seem daunghting... Not only that there are people out there charghing rediculous amounts of money for very little work and taking advantage of the unsuspecting
My build has cost a total of $48.50..
Cant complain with that.
Posted: August 6th, 2011, 1:57 am
by gregrobo
respect mate
Posted: August 6th, 2011, 11:06 am
by freeride588
Posted: August 6th, 2011, 1:09 pm
by coley13
it's all good.
My mum says i'm still cool...
Posted: August 6th, 2011, 2:02 pm
by coley13
i thought at this stage i will mock up the bike.. it wouldnt start, do you think it's fuel or electrical

check what swaps over from 125 to the 250. To my surprise the only thing that does not fit is the upper shock bolt... On the 125 there is a recess on the NUT side, the 250 does not have that recess. So the bolt is too short to get the nut on...
That is really bizarre, got me buggered why they would be different. Even though it's different suspension the hole should still be the same. Anyway doesnt matter thats easily sorted with a longer bolt. Everything else seems to fit at this stage
Posted: August 7th, 2011, 2:20 am
by gregrobo
check your head gasket mate might be blown looks cool

Posted: August 7th, 2011, 7:57 am
by freeride588
looks good man keep up the good work
Posted: August 7th, 2011, 9:16 am
by UknowDamright
coley13 wrote:rear pipe mount, cost me $3... I thought bugger welding it. I've used a 32mm super clamp with the bango clamp bolt going straight through it....
The reason i did this is i can use this pipe on both my 500's if i want to.

I like the clearance you have for your pipe, mine is within mm of touching the bottom of the air box. Probably because I used the CR250 air box??
Posted: August 7th, 2011, 12:23 pm
by coley13
gregrobo wrote:check your head gasket mate might be blown looks cool
ahhh crap, knew i forgot something
Posted: August 7th, 2011, 12:26 pm
by coley13
UknowDamright wrote:
I like the clearance you have for your pipe, mine is within mm of touching the bottom of the air box. Probably because I used the CR250 air box??
That seems strange, bent pipe maybe ? i think the box is the same, just the boots different. Did you use the original lower engine mounts ?
Posted: August 7th, 2011, 12:40 pm
by coley13
i've hit a bit of a stand still. Was going to throw my steely motor in until i build the new motor....
she's got cracked a piston... i noticed last ride she was getting a little piston slap, so though i should pull her down for a look see before fitting it to the AF.
Bit depressing, i'm so close to finishing...
Hopefully piston will arrive ASAP.
Posted: August 7th, 2011, 7:00 pm
by UknowDamright
coley13 wrote:UknowDamright wrote:
I like the clearance you have for your pipe, mine is within mm of touching the bottom of the air box. Probably because I used the CR250 air box??
That seems strange, bent pipe maybe ? i think the box is the same, just the boots different. Did you use the original lower engine mounts ?
yup stock bottom mounts, no worries..... I double checked it, and the reason it looks so close is because of the rubber piece that fits over the pipe connection to the silencer

Posted: August 8th, 2011, 1:18 am
by AlisoBob
coley13 wrote:
Anyway doesnt matter now, it's done
I would install the engine that I intended to use, and then "Match Drill" all 3 engine mount bolt holes to 7/16" ( Slightly oversize from 10mm) so the holes line up exactly with zero slop.
Then, shim any gaps ( dont draw the frame closed with the mounting bolts)
Done.
