cracked bridge....
-
100hp honda
- Posts: 4394
- Joined: July 4th, 2007, 6:57 pm
- Last active:
-
AlisoBob

- "Hoon-father"
- Posts: 15405
- Joined: May 31st, 2007, 6:39 pm
- Last active:
- Location: Aliso Viejo Ca
Consider this... When the bridge is relieved, the rings dont touch it. It dosent matter if the clearence is 0.0000000000001" or 10"......... if its not touching... then its not touching.qkenuf4u wrote: so what exactly would YOU DO BOB ???? have it welded so it can crack again ??
And if its not touching, then WTF does in matter if the bridge is there or not?
Making the exhaust port wider, and removing the bridge can cause issues, but yours is stock width, correct?
I'd cut the thing out, and carefully blend a small radius into the port floor and roof to guide the rings a little. DONT TOUCH THE VERTICAL EDGES. You dont want to widen the port at all.
Run '927 or blendzall at 32:1, and hang the fuck on!!! I wouldnt give it a second thought about it being removed.
-
nmdesertrider
- Posts: 678
- Joined: February 22nd, 2008, 8:18 pm
- Last active:
-
qkenuf4u
- Posts: 271
- Joined: September 12th, 2010, 5:08 pm
- Last active:
- Location: lake havasu city arizona
being you said that bob then whats the problem with leaving it alone and running it with the crack ? like you said its relieved (.004 now) and if its not touching then its not touching... are ya worried the top might move more than the bottom at the crack and catch a ring ??AlisoBob wrote:Consider this... When the bridge is relieved, the rings dont touch it. It dosent matter if the clearence is 0.0000000000001" or 10"......... if its not touching... then its not touching.qkenuf4u wrote: so what exactly would YOU DO BOB ???? have it welded so it can crack again ??
And if its not touching, then WTF does in matter if the bridge is there or not?
Making the exhaust port wider, and removing the bridge can cause issues, but yours is stock width, correct?
I'd cut the thing out, and carefully blend a small radius into the port floor and roof to guide the rings a little. DONT TOUCH THE VERTICAL EDGES. You dont want to widen the port at all.
Run '927 or blendzall at 32:1, and hang the fuck on!!! I wouldnt give it a second thought about it being removed.
i kinda have the cutter to do it but how much would you charge me to do it bob ??? ive port matched some car heads on my 68 camaro and they came out perfect but not sure about doing this head.... dont want to fuck it up .....
again thanks for the info guys... i take it all in and try to learn from it...
thanks
lance
-
qkenuf4u
- Posts: 271
- Joined: September 12th, 2010, 5:08 pm
- Last active:
- Location: lake havasu city arizona
have to see if can find one here in town... i know im capable but kinda worries me bout screwing it up.... 
again thanks for all the info...
one other thing is this gonna work ok with a GNARLY pipe ? i knows its a woods/bottom end pipe but thats ok cause it wont be doing any highway runs anyways... just around town/thru the powerlines...
thanks
lance
again thanks for all the info...
one other thing is this gonna work ok with a GNARLY pipe ? i knows its a woods/bottom end pipe but thats ok cause it wont be doing any highway runs anyways... just around town/thru the powerlines...
thanks
lance

-
Roostius_Maximus

- Site Admin
- Posts: 4641
- Joined: November 16th, 2007, 3:24 pm
- Last active:
- Location: Mt Nebo, Manitoba, Canada
- Contact:
The only castiron that can possibly ever be repaired is a crankshaft.
You have to pre-heat the cast so much that it would melt the aluminum of the bridge out. Welding is not an option, someone accepting $ to "weld" your bridge is a possibility
For information on properly repairing cast theres only 3 companies i can trust.
Shaftech of Fostoria OH, talk to Nick Bowes
Cylinder head center of Quebec, talk to anyone
National Crankshaft of Quebec, talk to Angelo
It needs to be heated, puddled, have powder blown in it, peened and alot more work that will never happen in a sleeve situation.
Btw: most cylinder heads that are repaired only last a short time, we do it for antique stuff and "parade" projects. Nothing that will ever see duty.
On to the pictures, I'm way too lazy to post them all so i'm just linking the folder where they are hosed....
http://cid-bd4aa2685d9bf2e9.office.live ... bridgeless
http://www.youtube.com/user/500bigbore
My CR500 Tech Reference... http://sdrv.ms/1a0CIiz
MRE Components... http://sdrv.ms/1bs2zhd

My CR500 Tech Reference... http://sdrv.ms/1a0CIiz
MRE Components... http://sdrv.ms/1bs2zhd
-
Roostius_Maximus
- Site Admin
- Posts: 4641
- Joined: November 16th, 2007, 3:24 pm
- Last active:
- Location: Mt Nebo, Manitoba, Canada
- Contact:
You can leave a spine hanging down if you like. I'd make it hang down .100" from the existing port ceiling, then roll the bottom edge back into the port, leaving a rib of the bridge thats only very shallow, but rounded like a bump, not sharp like a razor, and trail it off to anywhere between the whole length of the existing bridge, or minuimum 75% of its length. Same can be done on the floor. it only needs to trail 1/2 the length of the port.
The other way is like i have pictured, blow it out and forget it was there. dome the top of the port about 3mm. the port floor is opposite, the sides are higher than the center already, dont make it lower, its better to leave a tiny hump about 1mm higher than where it looks to be completely even.
The other way is like i have pictured, blow it out and forget it was there. dome the top of the port about 3mm. the port floor is opposite, the sides are higher than the center already, dont make it lower, its better to leave a tiny hump about 1mm higher than where it looks to be completely even.
http://www.youtube.com/user/500bigbore
My CR500 Tech Reference... http://sdrv.ms/1a0CIiz
MRE Components... http://sdrv.ms/1bs2zhd
My CR500 Tech Reference... http://sdrv.ms/1a0CIiz
MRE Components... http://sdrv.ms/1bs2zhd
-
qkenuf4u
- Posts: 271
- Joined: September 12th, 2010, 5:08 pm
- Last active:
- Location: lake havasu city arizona
ok perfect info. exactly what i needed.....Roostius_Maximus wrote:You can leave a spine hanging down if you like. I'd make it hang down .100" from the existing port ceiling, then roll the bottom edge back into the port, leaving a rib of the bridge thats only very shallow, but rounded like a bump, not sharp like a razor, and trail it off to anywhere between the whole length of the existing bridge, or minuimum 75% of its length. Same can be done on the floor. it only needs to trail 1/2 the length of the port.
The other way is like i have pictured, blow it out and forget it was there. dome the top of the port about 3mm. the port floor is opposite, the sides are higher than the center already, dont make it lower, its better to leave a tiny hump about 1mm higher than where it looks to be completely even.
so how does this affect power delivery ?
im gonna be running a gnarly pipe,
have any idea on jetting ?
600ft elevation, dry air, wont be riding it in under 60* weather prob.....
-
Roostius_Maximus
- Site Admin
- Posts: 4641
- Joined: November 16th, 2007, 3:24 pm
- Last active:
- Location: Mt Nebo, Manitoba, Canada
- Contact:
more rpm, i ran the same jet, but might have been a pinch fat before that.
http://www.youtube.com/user/500bigbore
My CR500 Tech Reference... http://sdrv.ms/1a0CIiz
MRE Components... http://sdrv.ms/1bs2zhd
My CR500 Tech Reference... http://sdrv.ms/1a0CIiz
MRE Components... http://sdrv.ms/1bs2zhd
-
qkenuf4u
- Posts: 271
- Joined: September 12th, 2010, 5:08 pm
- Last active:
- Location: lake havasu city arizona
have to finish the top but this what ya would want ? need to get some flapper wheels and smooth it all up a bit but its roughed in i hope.. the bottoms prob. 2-3mm at this point... i just re-read what you said to do so need to knock it down a bit more....Roostius_Maximus wrote:You can leave a spine hanging down if you like. I'd make it hang down .100" from the existing port ceiling, then roll the bottom edge back into the port, leaving a rib of the bridge thats only very shallow, but rounded like a bump, not sharp like a razor, and trail it off to anywhere between the whole length of the existing bridge, or minuimum 75% of its length. Same can be done on the floor. it only needs to trail 1/2 the length of the port.
The other way is like i have pictured, blow it out and forget it was there. dome the top of the port about 3mm. the port floor is opposite, the sides are higher than the center already, dont make it lower, its better to leave a tiny hump about 1mm higher than where it looks to be completely even.
Last edited by qkenuf4u on October 15th, 2010, 8:50 am, edited 1 time in total.
-
Roostius_Maximus
- Site Admin
- Posts: 4641
- Joined: November 16th, 2007, 3:24 pm
- Last active:
- Location: Mt Nebo, Manitoba, Canada
- Contact:
about 1/2 as long on the top and after you buff it all down, should be good
http://www.youtube.com/user/500bigbore
My CR500 Tech Reference... http://sdrv.ms/1a0CIiz
MRE Components... http://sdrv.ms/1bs2zhd
My CR500 Tech Reference... http://sdrv.ms/1a0CIiz
MRE Components... http://sdrv.ms/1bs2zhd
-
south central hoon
- Last active:
AlisoBob wrote:I ride a hell of a lot more often than you do bob. i've got 47 hours on my rebuild that i did 9 weeks ago.qkenuf4u wrote:2 bore jobs in 4 years? Remind me not to run whatever oil and airfilter you run.south central hoon wrote:i've been running mine with a cracked bridge for 4 years. 2 bore jobs later ...
-
south central hoon
- Last active:
-
qkenuf4u
- Posts: 271
- Joined: September 12th, 2010, 5:08 pm
- Last active:
- Location: lake havasu city arizona
quote="AlisoBob"]You the man!Roostius_Maximus wrote:about 1/2 as long on the top and after you buff it all down, should be good
( I'd take the whole thing out though....)[/quote]
ok so which is it ?? leave a little like roost or take it all like bob ?????
my poor little carbide cutter that ive had for a few years gave its life for this job.... (no butter to keep it clean and its all chewed up now plus filled with alum
-
Roostius_Maximus
- Site Admin
- Posts: 4641
- Joined: November 16th, 2007, 3:24 pm
- Last active:
- Location: Mt Nebo, Manitoba, Canada
- Contact:
look at my pics, i took it all out, but would do antother leaving a ramp
http://www.youtube.com/user/500bigbore
My CR500 Tech Reference... http://sdrv.ms/1a0CIiz
MRE Components... http://sdrv.ms/1bs2zhd
My CR500 Tech Reference... http://sdrv.ms/1a0CIiz
MRE Components... http://sdrv.ms/1bs2zhd
-
qkenuf4u
- Posts: 271
- Joined: September 12th, 2010, 5:08 pm
- Last active:
- Location: lake havasu city arizona
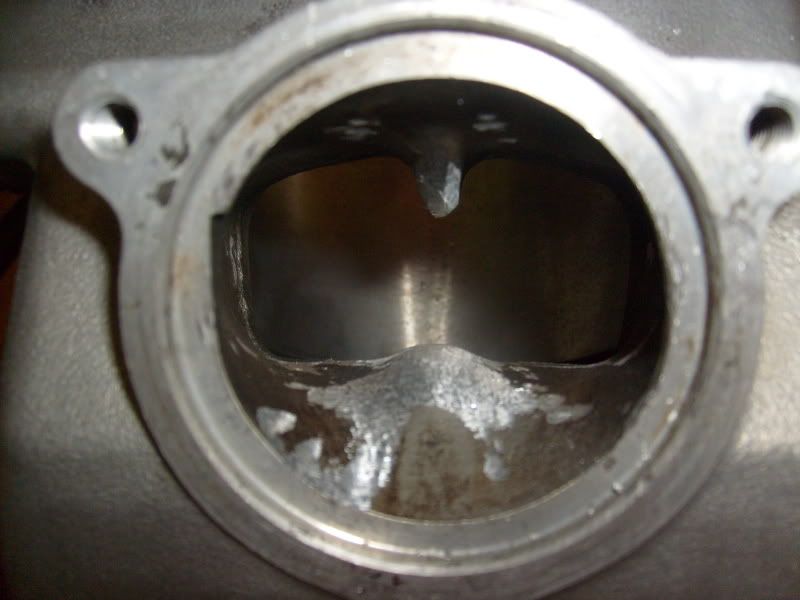
ok at this point im leaving a bit.... heres a finished pic... cleaned up well/smooth with the one drum roll i had.... have a really nice ramp top/bottom for the ring ... hoping the rings dont chatter to bad... thats a BIG HOLE.....Roostius_Maximus wrote:look at my pics, i took it all out, but would do antother leaving a ramp


-
Roostius_Maximus
- Site Admin
- Posts: 4641
- Joined: November 16th, 2007, 3:24 pm
- Last active:
- Location: Mt Nebo, Manitoba, Canada
- Contact:
nice, and you've also given yourself a chance to chuck that flat edged carbide. Unless you're working with alot of cast or something.
if you ever need to do more work in a cylinder, go to
http://www.buckeyecarbide.com
check out the 6" long - 3/8 egg shape - single cut, # SE-3L6
get a long shank die grinder and a flow regulator .
if you ever need to do more work in a cylinder, go to
http://www.buckeyecarbide.com
check out the 6" long - 3/8 egg shape - single cut, # SE-3L6
get a long shank die grinder and a flow regulator .
http://www.youtube.com/user/500bigbore
My CR500 Tech Reference... http://sdrv.ms/1a0CIiz
MRE Components... http://sdrv.ms/1bs2zhd
My CR500 Tech Reference... http://sdrv.ms/1a0CIiz
MRE Components... http://sdrv.ms/1bs2zhd
-
qkenuf4u
- Posts: 271
- Joined: September 12th, 2010, 5:08 pm
- Last active:
- Location: lake havasu city arizona
cool thanks for the link.....Roostius_Maximus wrote:nice, and you've also given yourself a chance to chuck that flat edged carbide. Unless you're working with alot of cast or something.
if you ever need to do more work in a cylinder, go to
http://www.buckeyecarbide.com
check out the 6" long - 3/8 egg shape - single cut, # SE-3L6
get a long shank die grinder and a flow regulator .
thanks again for the info on what needed removed.. thats all i needed to see/know ... as i said ive ported heads on a car so i understand a little about it but just wasnt sure how to go about it with the cr cylinder...
soon as i get my case back from teh welder i will be able to put this thing together today... got a good carb and pipe coming so will be able to fire it off soon....
long way to go before it can be rode but thats ok....
-
nmdesertrider
- Posts: 678
- Joined: February 22nd, 2008, 8:18 pm
- Last active:
-
2strokeforever

- Posts: 1524
- Joined: November 13th, 2009, 1:04 pm
- Last active:
- Location: Vernon B.C Canada
-
Roostius_Maximus
- Site Admin
- Posts: 4641
- Joined: November 16th, 2007, 3:24 pm
- Last active:
- Location: Mt Nebo, Manitoba, Canada
- Contact:
i stitched 20+ inches on a massey block and its still running, welded plenty of things that cant be replaced. Never does any of it work as good as original.
This isnt a candidate for welding anyhow
This isnt a candidate for welding anyhow
http://www.youtube.com/user/500bigbore
My CR500 Tech Reference... http://sdrv.ms/1a0CIiz
MRE Components... http://sdrv.ms/1bs2zhd
My CR500 Tech Reference... http://sdrv.ms/1a0CIiz
MRE Components... http://sdrv.ms/1bs2zhd
-
Roostius_Maximus
- Site Admin
- Posts: 4641
- Joined: November 16th, 2007, 3:24 pm
- Last active:
- Location: Mt Nebo, Manitoba, Canada
- Contact:
I've got a 101 massey antique tractor puller in the shop right now, has 8 international super M rods cut and welded to be longer, has almost 2" more stroke than stock and close to .750 more bore. almost double the cid.
Welding has its place, not on a cylinder wall.
I'll post some pictures if you wannna see this stuff.
there has to be something to weld to
Welding has its place, not on a cylinder wall.
I'll post some pictures if you wannna see this stuff.
there has to be something to weld to
http://www.youtube.com/user/500bigbore
My CR500 Tech Reference... http://sdrv.ms/1a0CIiz
MRE Components... http://sdrv.ms/1bs2zhd
My CR500 Tech Reference... http://sdrv.ms/1a0CIiz
MRE Components... http://sdrv.ms/1bs2zhd