Thanks Zenith
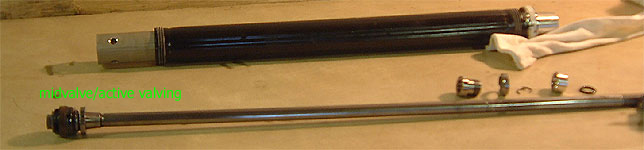
This is based on 2000 CR 125 forks which are USD (up-side-down) single chamber forks. If yours are twin chambers (eg. Showa Twin chambers or the newer Kayaba twin chamber design) the technique will be a bit different. If you leave the IC (inner chamber) together in the twin chambers the procedure is similar, but it would be WELL worth clarifying in your manual before launching into it!
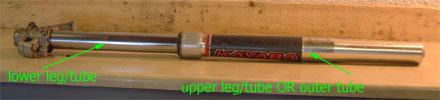
I’ve tried to label as many of the parts as I can but some may be labelled well after I’ve mentioned them so look down through the article if you don’t know which bit I’m referring to
----------
Get the fork off the bike and remove the fork guard.
----------

Clean the fork up well; you don’t want any dirt falling into the internals during reassembly.
----------
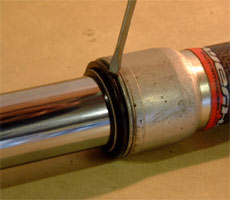
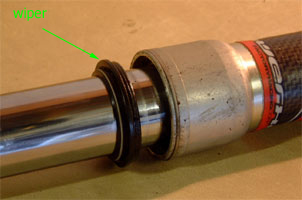
Using a medium sized flat blade screwdriver pry the wiper out as shown. Do it as gently as possible so you don’t damage the wiper too much.
----------

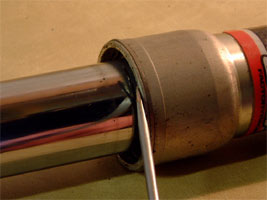
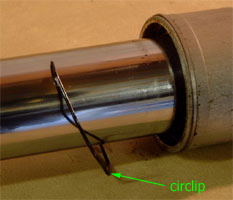
If you now look up where the wiper was you will see there is a circular(ish) clip that holds the actual fork seal in place. The clip is roughly star shaped so using a flat blade screwdriver you can unclip it, as shown in the above pictures. Be careful not to scratch the lower fork leg(shiny one) when doing this.
----------
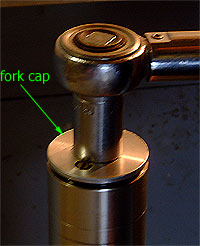
Now you can remove the fork cap using a wrench(19mm in this case). An air impact wrench can be handy if you can’t get the cap of, but take it easy as the threads are quite small. If you don’t have one you can put the fork back into the triple clamps and tighten the lower triple clamp pinch bolts, then remove the fork cap.
----------
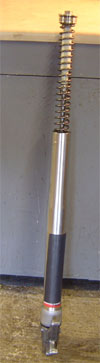
When you loosen off the fork cap the outer slider will now be free to move down as shown, although the fork cap is still attached to the damper rod.
----------
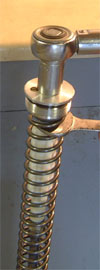
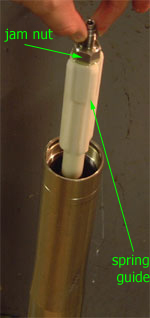
Now you need to get the fork cap off the damper rod. So hold the jam nut(long nut located under the fork cap) with one wrench and with another unscrew the fork cap. Depending on your forks you may need to push down the spring and/or rubber bumper before you’ll be able to see the jam nut but it will be there somewhere! Again a quick blast with an air impact wrench will get the fork cap off if it has been over tightened.
----------
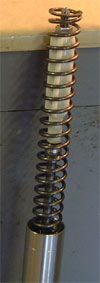
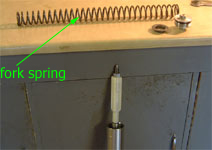
Now the fork cap is off you can lift out the spring, be warned it will be dripping with oil.
----------
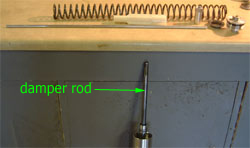
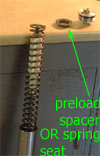
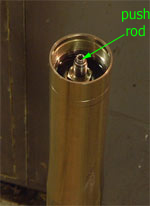
Inside the damper rod you will see a smaller rod sticking up, this is a push rod and basically transfers adjustments made to the rebound clicker screw on top of the fork cap down to the mid valve. Pull it out now. Also unscrew the jam nut and remove it, you will now be able to remove the spring guide as well.
----------
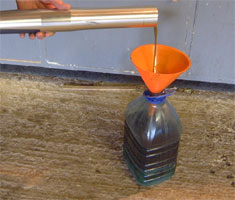
Now pour out as much fork oil as possible from the fork, do not reuse it!
----------
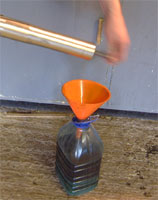
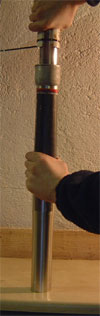
When as much that is going to pour out has, pump the damper rod as shown. This will empty the cartridge. If you are going to remove the base valve and cartridge you don’t need to do this as all the oil will come out much easier with the cartridge out of the forks. However if you do not want to remove the cartridge etc you need to keep pumping the damper rod until oil stops coming out, this could take 30-40 pumps. You will feel the damping rod start to cavitate(That is when you are pulling the rod there will be resistance(damping), then all of a sudden the rod will pull easily) as the cartridge empties, you will know the cartridge is empty when there is no resistance to you pulling/pushing the damping rod.
----------
******* (These steps marked with red stars are not necessary to just change fork seals, but allow you dismantle the fork completely and thoroughly clean out all the old oil. Also you get to see how all the damper valving works!)
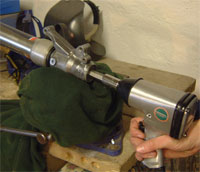
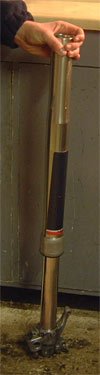
If you decide you want to remove the cartridge and base valve then you want to mount the fork in a soft-grip vice as shown and unscrew the base valve(14mm hex on the bottom of the fork leg). The base valve actually screws into the cartridge, not the fork leg so it will not just unscrew with a large Allen key or anything. You have two options – 1. Buy a cartridge holding tool that you put into the top of the fork, then you can use a 14mm hex on a wrench to unscrew the base valve or 2. Put the fork spring back into the fork and have somebody push it in, this will hold the cartridge against the bottom of the fork leg, then you use an air impact gun to unscrew the base valve. The problem with number 1 is you need to buy a different cartridge holding tool for different forks, you can make one but I don’t think it’s worth the hassle. Number 2 is the way I show in the picture above.
----------
*******
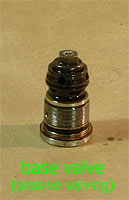
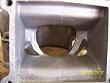
When you get the base valve out it will look something like this. It controls damping primarily for fork compression (hence the reason the compression adjuster screw is on the bottom of the fork, on Kayabas anyway), although the valve will vary from bike to bike. Check the rubber o-ring and copper washer, if either is damaged replace them.
Now that you have the base valve out you can pull on the damper rod and the cartridge will come out.
----------
*******

This is the cartridge and base valve. Note on this bike the cartridge is covered with a black rubber ‘bladder’, which is supposed to provide better bottoming control simpler to the way ‘sub-tanks’ work.
----------
*******
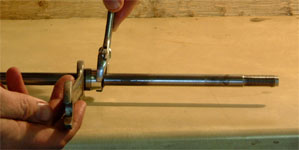
Here I am removing the bottoming cone that also stops the damper rod going too far into the cartridge. On these forks it is simply a matter of screwing the two parts apart using a 19mm spanner and a ground down 19mm spanner. Other forks use different mechanisms though… On the YZs for instance you have to take the top of the cartridge which can be quite a job and not for the beginnner. If you do not have a simple bottoming cone like the one in this CR just don't bother taking the damper rod out of the cartridge, it's not worth the hassle!
----------
*******
This is what the bottoming cone looks like in pieces.
----------
*******
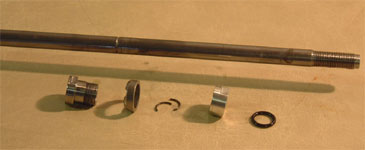
Now that you have the bottoming cone off, the damper rod can just be pushed out the bottom of the cartridge so you are left with things as shown in the above pic. On the end of the damper rod you can see the rebound piston, shim stacks and maybe check valve which together primarily provide your active or rebound damping. You should use compressed air to blow all the old oil and debris out of the piston and around the shims etc. Same goes from the base valve.
If you decided to take out the cartridge you can now put it back in again. Put the cartridge into the fork and screw the base valve in finger tight. You will now need to hold the cartridge to stop it spinning while you tighten up the base valve to the proper torque. You can buy a cartridge holding tool for this. Or if you put the spring back into the fork and put on the fork cap and have another person compress the fork, the pressure of the spring will stop the cartridge spinning so you can tighten it up!
----------
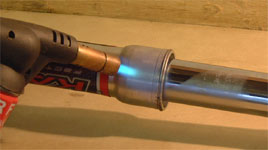
Now we want to separate the inner and outer fork sliders. At the moment they are being held together by the fork seal and the two bushes. Heat the seal housing gently as shown, this will make it easier to free the bush and seal and limit bush damage. Do NOT over heat it, 15-20 seconds of heating should suffice.
* Since I first wrote this article I’ve been told that a better way of heating the seal housing is to slowly pour half a kettle of hot water over the housing. This will stop the flame discolouring and marring the look of your forks and will also prevent you overheating the seal housing which would melt rubber parts in the housing.
----------
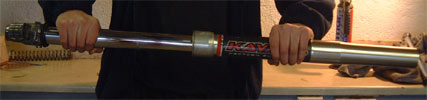
Now grip the fork as I am in the picture and using fast but NOT forceful movements repeatedly pull the two sliders apart. You will see the seal coming out a little bit each time. Sometimes they will separate first time, sometimes it can take a LOT of pulls so just keep going.
----------

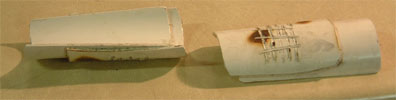
So when you get the fork sliders apart you will have the bottom one like this.
----------
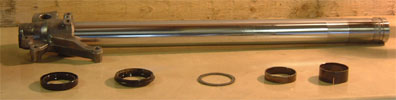
Remove the bushes and seals etc from the fork slider.
----------
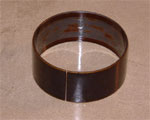
This is one of the bushes, you will see it is covered in what looks like black plastic or Teflon on either the outside or inside. If this is considerably worn at any point you need to replace that bush, and probably the other one as well.
----------
Now back to the fork seals. You should have cleaned up the lower fork leg at this stage, removed old oil and dirt etc. We now need to get the wiper and new seal back onto the fork slider, WITHOUT damaging the lips of the new seal. The best way to do this is wrap a piece of plastic bag over the top of the fork (covering the sharp bush holder etc.), then coat this bag in a liberal amount of fork oil. Cover the wiper, new fork seal and bushes in clean fork oil as well. Now just slide the wiper and new seal over this bag onto the fork as shown above. Obviously you want to put the wiper on first, then the seal. Then remove the bag and put back on the washer, not the washer has a smooth round side and a sharper side, the smooth roundish side should face the seal. Then put on the two bushes.
----------
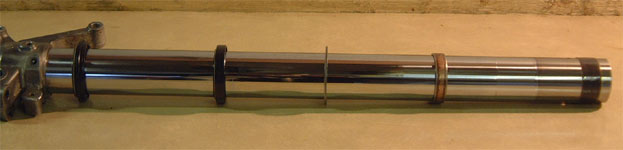
So now your lower fork slider should look like this. Now just place this lower slider back inside the upper slider. The first bush on the end of the lower slider will slide into the upper slider easily. Next comes the second bush though, this needs to be driven back into the upper fork slider.
----------
You can either buy a fork seal driver or make one like I have, shown in the above picture. I simply cut a length of PVC pipe (of diameter close to that of the fork slider (46mm)) along its length, then glued (PVC cement) a few pieces together to form a clam shell type arrangement as shown. You need two different ends on each half, one standard and one with an overhang. Both ends should be straight so they apply even force to the seals and bushes. The standard end of the driver is for driving in the bush while the overhang end allows the driver drive the seal without squashing the seal lips. If you look at the seal you’ll see what I’m talking about…
----------
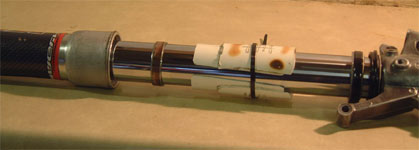
Set up the fork as shown here. I have cable tied the driver on loosely just to make it easier to hold. Note the standard end of the driver is being used to drive in the bush.
----------
Now heat the seal housing again as before, this will make it expand so the bush and seal can be driven in easier.
* Again : Since I first wrote this article I’ve been reliably informed that a better way of heating the seal housing is to slowly pour half a kettle of hot water over the housing. This will stop the flame discolouring and marring the look of your forks and will also prevent you overheating the seal housing which would melt rubber parts in the housing.
----------
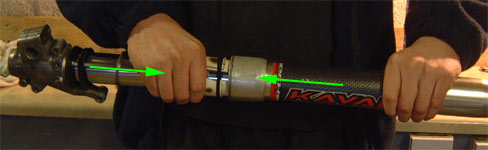
So with one hand (my left in the pic) you hold the upper fork tube, with the other squeeze your seal driver as hard as you can onto the lower fork tube and repeatedly push the two fork tubes together in the direction of the arrows. So to clarify you are expanding the fork, the driving it back together again, each time the end of the seal driver will strike the bush and push it in another bit. Keep doing this until the seal is fully in. It is sometimes easier to hold the fork upright as I have done in the second picture. If it seems like the bush is halfway in but won’t go any further, go back a step and heat the seal/bush housing again.
----------
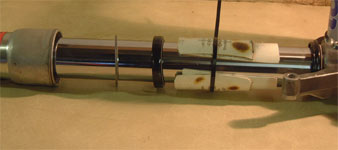
So the bush is now fully in. If the seal/bush housing has cooled you should heat it again now to make the seal go in easier. Next the washer just sits in on top of the bush, it won’t need to be driven in. Now move the seal along the fork leg and get it lined up where it will be driven into the seal/bush housing. Take the fork seal driver off and put it on the other way; i.e. the overhanging end facing the seal as in the picture above. This will prevent the driver destroying the lips of the seal when you are driving it in. Now just repeat what you did to drive the bush in. You will know the seal is fully in when you can clearly see the grove that the retaining circlip sits into ALL THE WAY AROUND THE SEAL HOUSING.
----------

So now the seal is properly seated you can put in the seal retaining circlip. It simply sits into the grove above the seal. Use your fingers to compress the circlip and push it most of the way in, then you can use a flat blade screwdriver to push it into position. It should make a satisfying click as it sits into the grove. If it doesn’t sit into the grove properly at ANY point, take it back out and drive the seal in more at that point. The circlip is very important so you can’t take risks with it.
----------
All that remains to do is add the correct quantity of fork oil and put the final components back in. So now you need to put the plastic spring guide back on and screw the jam nut done gently just to hold the guide onto the damping rod. Let the damping rod go back down into the fork. Now fill the fork to the top with fork oil. Pump the damping rod repeatedly until there is a consistent feel to the strokes (ie. there is no point in the stroke where it is suddenly easy to push/pull the rod), keep topping up the oil as it will go down as oil gets drawn into the cartridge. This is basically bleeding and filling the cartridge with fork oil.
----------
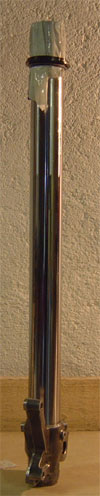
Now that the cartridge is full of oil we need to get oil in between the inner and outer fork tubes. If you weren’t to do this you may end up with inconsistent oil height readings as you’ll never know just how much oil is between the two tubes. So fill the oil right to the top of the fork again (it should be fuller then in this picture).
----------
Now slowly extend the fork its full length, this will allow the oil get in between the two tubes. Repeat this a few times. You may need to let the fork collapse fully and fill it to the top again a few times. Keep repeating this until you are happy the gap between the two fork tubes is full.
----------
Next we need to set the correct oil level. The oil level is measured when the fork is collapsed (like in the picture two up from this one), from the top of the outer tube to the top of the oil. So you are really measuring the air gap but it is more commonly called the oil level.
There are a few different ways of doing this. One way is to fill the oil up a bit, then stick a small ruler down into the fork and measure the gap, then repeatedly add/remove oil and re-measure until you get to the level you want. This method is perfectly OK but can be some hassle.
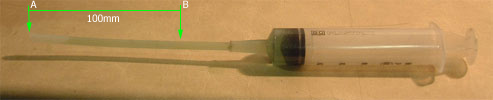
The other way is to fill the fork to the top with oil, then remove oil with a syringe down to the correct level. I use the syringe shown above with a length of tubing pushed onto the end. Suppose you want an oil level of 100mm, measure 100mm from the end of the tubing and mark that point with a knife or something. Now just stick the tubing down into the fork until the mark is at the top of the fork, now use the syringe to suck oil out until it stops sucking up oil (ie. The oil level is now at the bottom of the tube)
Note the oil level is set with the spring guide and push rod in the forks but WITHOUT the springs!
----------
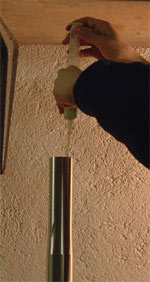
This just shows me sucking oil out of the fork to set the oil level.
----------
Once you have the oil level set you are ready to put the fork back together. You are basically doing the opposite of what you did at the beginning to disassemble the fork.
So you need to pull the damper rod up out of the fork as far as it will go, then slip the fork spring over it. It can be difficult to stop the rod sliding back down into the cartridge while doing this so it is often helpful to have somebody else keep it up while you lower the spring on.
Once the spring is on you need to screw the fork cap back on to the damper rod. Before doing this you need to screw the clicker screw in the centre of the fork cap as far out as it will go (WIHOUT FORCING IT!). (Make sure you remember how many click out from fully seated it was before you started). If there was a spacer sitting on top of the fork spring put it on now. Now screw the fork cap onto the damper rod until it stops, just screw it finger tight. Then screw the jam nut back up the damper rod until it meets the fork cap, tighten them together to the correct torque. If you do this any other way, such as not screwing the cap fully down before tightening the jam nut to it you will effect how much of an effect the rebound clicker has at certain turns out, making it extremely difficult to set the forks up correctly. Now screw the fork cap into the outer fork tube. It is easier to just do this finger tight and then put the forks back on the bike and into the triple clamps, then set the correct torque for the fork caps because the triple clamps will hold the fork for you while you tighten.