CRF250R Gen 4 CR5 conversion

Building Tips, Suspension Set Ups, Conversion Parts .... Build to your Heart's Content!
Post Reply
User avatar
Scotty
Posts: 18
Joined: March 20th, 2013, 10:11 pm
Location: South Australia
Contact:

CRF250R Gen 4 CR5 conversion

Post by Scotty »

Hey all,

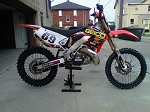
Figured I should post up the build pics for those who are interested, I have been reading up big for the last year on both forums and the knowledge available has been invaluable and gave me confidence in doing my own. I live in Australia so importing one becomes pretty expensive.

For this conversion I picked up a rolling CRF250R 2007 chassis and I am using my 94' CR500 motor. I ordered Jercs conversion kit which is not only cost effective but accurate for fittment, easy to do, and the instructions and support from him is good :cool:

The hardest thing for me was the actual cutting the frame up, it just didnt feel right but it had to be done and the results have changed my thoughts on that, now pass me that saw !!


pics or it didnt happen right.
Image

Old V new.
Image

Image

This jig is a must for saving time. now who did i get that from I wonder?
Image

Image

Image

CR125 spacers
Image

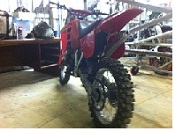
bit of a clean up, motor in.
Image

Image

Headstay brackets lined up nicely.
Image

Radiator outlet ready to weld
Image

Image

ready for my welder to finish the brackets.
Image

MRE decomp head.
Image

Hinson basket and oem fibres. Magura hyd clutch.
Image

Parts on order:
OEM reeds
CR250 airboot and cage
CR250 brake pedal
CR5 kicker
head stem bearings.
new plastics
Clarke 3G tank
CRF'X' model tank petcock.
bolts/screws, collets, rubbers for tank etc.

Once all this is done it is the shakedown ride.
Next on the list will be:
Suspension reset for my style and weight.
Sticker kit yet to be designed

Later on will be a full engine rebuild.
Dig ign
Lighting stator/kit
D inj if or when it is proven and available.
Maybe a GMX tank (bling)

Recommend that a good experienced alloy TIG welder is sourced

Biggest issue is the unpredictable shipping time for parts.

Would I do another one, yes
:wink:
Last edited by Scotty on March 26th, 2013, 10:57 pm, edited 1 time in total.
Building my own and always waiting for parts
User avatar
AlisoBob
"Hoon-father"
Posts: 15404
Joined: May 31st, 2007, 6:39 pm
Location: Aliso Viejo Ca

Post by AlisoBob »

:cool:
User avatar
fmikhele
Posts: 147
Joined: April 10th, 2012, 7:26 am

Post by fmikhele »

Parts on order:
OEM reeds
CR250 airboot and cage
CR250 brake pedal
CR5 kicker
head stem bearings.
new plastics
Clarke 3G tank
CRF'X' model tank petcock.
bolts/screws, collets, rubbers for tank etc.
CR250 kicker shares the same spline as the CR500 and fits the frame better!
User avatar
Scotty
Posts: 18
Joined: March 20th, 2013, 10:11 pm
Location: South Australia
Contact:

Post by Scotty »

I will see if i can change the order.

Thanks.
Building my own and always waiting for parts
User avatar
fmikhele
Posts: 147
Joined: April 10th, 2012, 7:26 am

Post by fmikhele »

Np. I am running the 2000-2001 GEN 2 kicker. I like the GEN 3 (2002 and up) kicker alot more but find the bushings in it wear out quickly and it rattles like crazy. Also believe with the gen 3 kicker if you run a FMF pipe it will interfere with the kicker about mid-way down the shaft (Atleast it did for me). You can try to avoid this by "clocking" the spline on the the kicker mechanism or just run a PC pipe which should have a bit more clearance.
kibler
Posts: 20
Joined: November 2nd, 2012, 7:23 pm

ji

Post by kibler »

Where are you guys getting those nice looking engine jigs? Man, would that make it easier....
Kibler
User avatar
Scotty
Posts: 18
Joined: March 20th, 2013, 10:11 pm
Location: South Australia
Contact:

Post by Scotty »

I am almost certain I got it from Jercs on here, it was some time ago.
Building my own and always waiting for parts
kevin_s
Posts: 284
Joined: May 2nd, 2011, 6:00 pm

Post by kevin_s »

Scotty wrote:I am almost certain I got it from Jercs on here, it was some time ago.
Looks like one of my jigs.....
User avatar
Scotty
Posts: 18
Joined: March 20th, 2013, 10:11 pm
Location: South Australia
Contact:

Post by Scotty »

kevin_s wrote: Looks like one of my jigs.....
Quite possible, I cant remember whos it was but it sure saves time :cool:
Building my own and always waiting for parts
kibler
Posts: 20
Joined: November 2nd, 2012, 7:23 pm

Post by kibler »

Who has one I can borrow or rent or something.....?
Kibler
User avatar
gregrobo
Posts: 1064
Joined: April 18th, 2009, 8:47 am
Location: kalgoorlie, western australia

Post by gregrobo »

CR250 kicker shares the same spline as the CR500 and fits the frame better![/quote]

and breaks easier busted 2 brand new 250 kickers within a month of fitting them us the cr500 kicker its designed to start a cr500
only posties ride 4 stroke hondas
goldfields sheet metal fabrication
98 yzfr1
05 crf 500 race tech goldies
2010 rmz 500af
01 banshee
User avatar
Scotty
Posts: 18
Joined: March 20th, 2013, 10:11 pm
Location: South Australia
Contact:

Post by Scotty »

Image

Image

Image

Image


Image

Image

Image
Building my own and always waiting for parts
User avatar
AlisoBob
"Hoon-father"
Posts: 15404
Joined: May 31st, 2007, 6:39 pm
Location: Aliso Viejo Ca

Post by AlisoBob »

Sweet!!!!!!!
User avatar
Scotty
Posts: 18
Joined: March 20th, 2013, 10:11 pm
Location: South Australia
Contact:

Post by Scotty »

I need to prune those bushes in the background. :roll:


Its running after a few electical issues. My fault :roll:

How do you get youtube to work?

Heading out thursday for the shakedown, all goes well the Husky will stay in the trailer for the long weekend, had a few issues and moments of how the hell can I make this work, having a beer and thinking about it worked many times. Beer is good :wink:

I will miss the lounge chair seat ride of the steel frame.
Looking at the old frame then I look at this, those who have done it know :cool:
Building my own and always waiting for parts
User avatar
Scotty
Posts: 18
Joined: March 20th, 2013, 10:11 pm
Location: South Australia
Contact:

Post by Scotty »

Oppertunity arose to take it to a friends property yesterday, not many good photos as it was raining too much to have my good DSLR out.

Image

Image

I tell you what it is definately like a scalpel as others have mentioned, it felt light and turns brilliantly, ran 14/45 gearing and it was much more manageable in the tight single trails out of the turns, it has to be one of the best bikes I have riden. Didnt notice any vibrations but I will find out on the longer trails.

Not one issue with the build results, the motor ran sweet with new reeds and Roosti's decomp head and could ride a gear higher even in the tight stuff. it was jumped a few times, we hit the stutters fairly quick and generally tested over 3+ hours.

Front tyre just barely touches the pipe under full fork compression. Should be fine.
Image

Waiting on some stickers and a few tasty bits to finish it off, what a ride from the building phase to the testing and having no issues, if it wasnt for this website and all the freely available info i would never have attempted my own build.

Cheers all :cool:


If your thinking about converting do it, so much better than the steel frame version.
Building my own and always waiting for parts
User avatar
Scotty
Posts: 18
Joined: March 20th, 2013, 10:11 pm
Location: South Australia
Contact:

Post by Scotty »

Stickered up oem look with kind of a retro throwback
White barkbusters
Rad overflow bottle in airbox
Stegpegz
New front pads
14/45 gearing


Image


parts to come:
red rad hoses
Boyesen black engine covers
Scotts steering damper kit
Fast flex bars
CRF450X brake pedal (might fit better)
pivot pegz
Full suspension rebuild and geometry setup (this week.)


Went away for a 4 day weekend out in the sand in the Mallee country with the club for FULL on testing and multiple rider workout. :D
Building my own and always waiting for parts
User avatar
other
Posts: 338
Joined: January 25th, 2010, 5:11 am
Location: Perth Hills, Western Australia

Gen 4

Post by other »

sweet !
o.t.h.e.r . . . . .Over The Hill Enduro Rider
Slabman
Posts: 20
Joined: January 10th, 2013, 5:36 pm

Post by Slabman »

Can you shoot up a pic of the rad overflow in the airbow please? Nice sled!
User avatar
Scotty
Posts: 18
Joined: March 20th, 2013, 10:11 pm
Location: South Australia
Contact:

Post by Scotty »

Slabman wrote:Can you shoot up a pic of the rad overflow in the airbow please? Nice sled!
thanks.


This is the kit i used.
Zip tied inside the airbox as there is little space anywhere else for it.. It works.

Image

Photos later when i get access to the bike.
Building my own and always waiting for parts
Post Reply